
I’ve been using a Tada68 mechanical keyboard as my daily driver for the past 6 years. The keyboard is powered by an Atmel Atmega32U4 microcontroller, and is fully programmable with firmware such as QMK.
Recently, I tried to update my keymap with some new key mappings, which involves flashing the firmware onto the keyboard. The stock bootloader on the Tada68 is the LUFA mass storage bootloader, which, in bootloader mode, makes it appear as a mass storage device. You can then copy a firmware BIN file to the storage volume, which is then flashed to the microcontroller’s flash storage. However, this bootloader is known to be very prone to bricking, because writes are often not flushed to the FAT filesystem correctly before it resets, causing the bootloader to be corrupted. Unfortunately, this happened to me.
The only way to recover from this situation is to re-flash the bootloader direct to the Atmega32U4 MCU using the ISP pins on the PCB of the Tada68. This requires special hardware, such as an ISP programmer like one of the many USBasp clones, or a device that has ISP pins on it, such as a Raspberry Pi or an Arduino board. Luckily, I had a Pro Micro lying around, so I used that.
Flashing a Pro Micro with QMK’s ISP programmer firmware
First, clone the qmk_firmware repo:
$ git clone https://github.com/qmk/qmk_firmware.git
$ cd git/qmk_firmware/
Now, connect the Pro Micro to your computer using a USB cable, and put it into
bootloader mode by shorting the RST and GND pins, then flash the
pro_micro_ISP_B6_10.hex file using avrdude:
$ sudo avrdude -p atmega32u4 -c avr109 -P /dev/ttyACM0 -U flash:w:util/pro_micro_ISP_B6_10.hex
If successful, /var/log/kern.log should show something like:
Mar 31 14:53:53 seg kernel: [15186.630387] usb 4-1: new full-speed USB device number 8 using uhci_hcd
Mar 31 14:53:53 seg kernel: [15186.833534] usb 4-1: New USB device found, idVendor=16c0, idProduct=0483, bcdDevice= 1.00
Mar 31 14:53:53 seg kernel: [15186.833554] usb 4-1: New USB device strings: Mfr=1, Product=2, SerialNumber=3
Mar 31 14:53:53 seg kernel: [15186.833563] usb 4-1: Product: USB Serial
Mar 31 14:53:53 seg kernel: [15186.833570] usb 4-1: Manufacturer: Teensyduino
Mar 31 14:53:53 seg kernel: [15186.833576] usb 4-1: SerialNumber: 12345
Mar 31 14:53:53 seg kernel: [15186.843530] cdc_acm 4-1:1.0: ttyACM0: USB ACM device
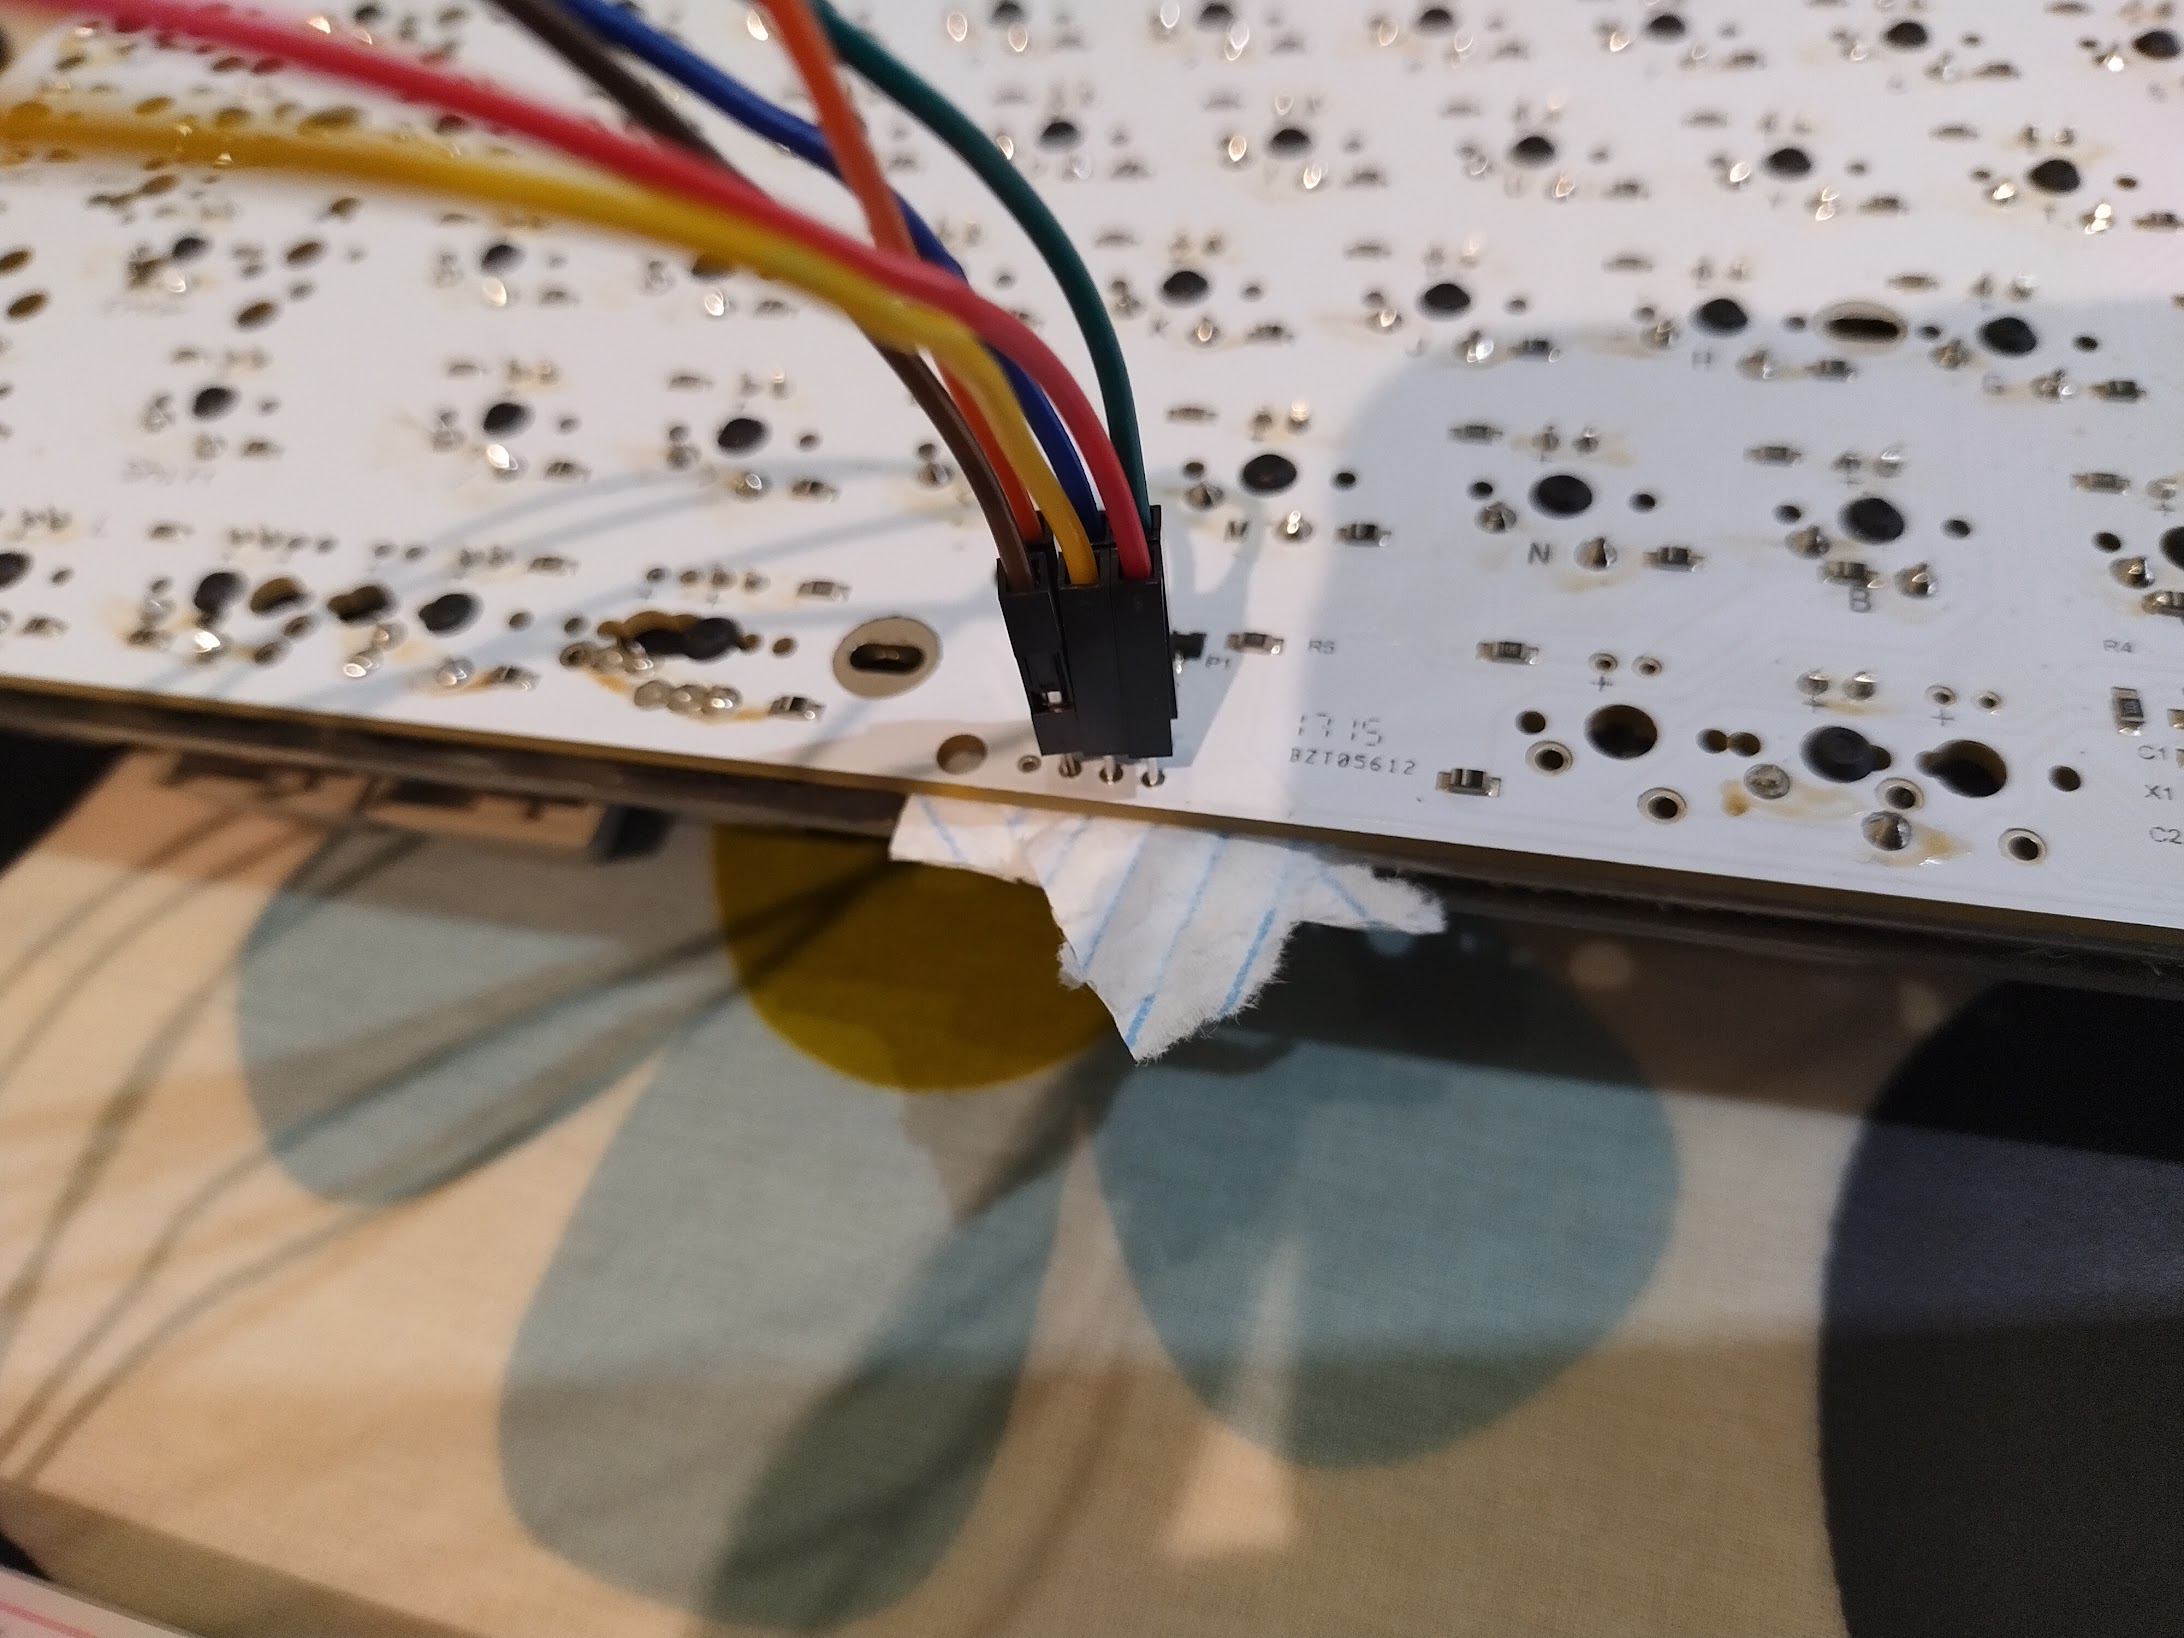
Connect the Pro Micro to the ISP pads on the PCB
You need to remove some keycaps from the Tada68 and unscrew the 6 tiny screws
and remove the PCB and mounting plate from the case. On the underside of the
PCB, at the bottom centre, you will see 7 small through-hole pads. 6 of these
are the ISP connectors, with the Ground connector on the bottom left, and the
VCC (5 volt power) on the bottom right. Ignore the single connector on the left.
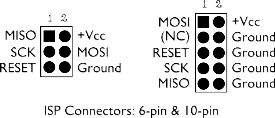
        RESET     SCK    MISO
           O       O       O
   O       O       O       O
Unused  Ground   MOSI     VCC
------------------------------
The connectors follow the 6 pin layout on this diagram:
To connect the Pro Micro up to these ISP connectors you will need 6 Dupont jumper cables with male connectors on one end. The male pins fit exactly into the through-hole ISP pads.
Be careful not to push the cable pins too far through the holes as they may touch the space bar stabiliser underneath and short the pins, which could damage the board.
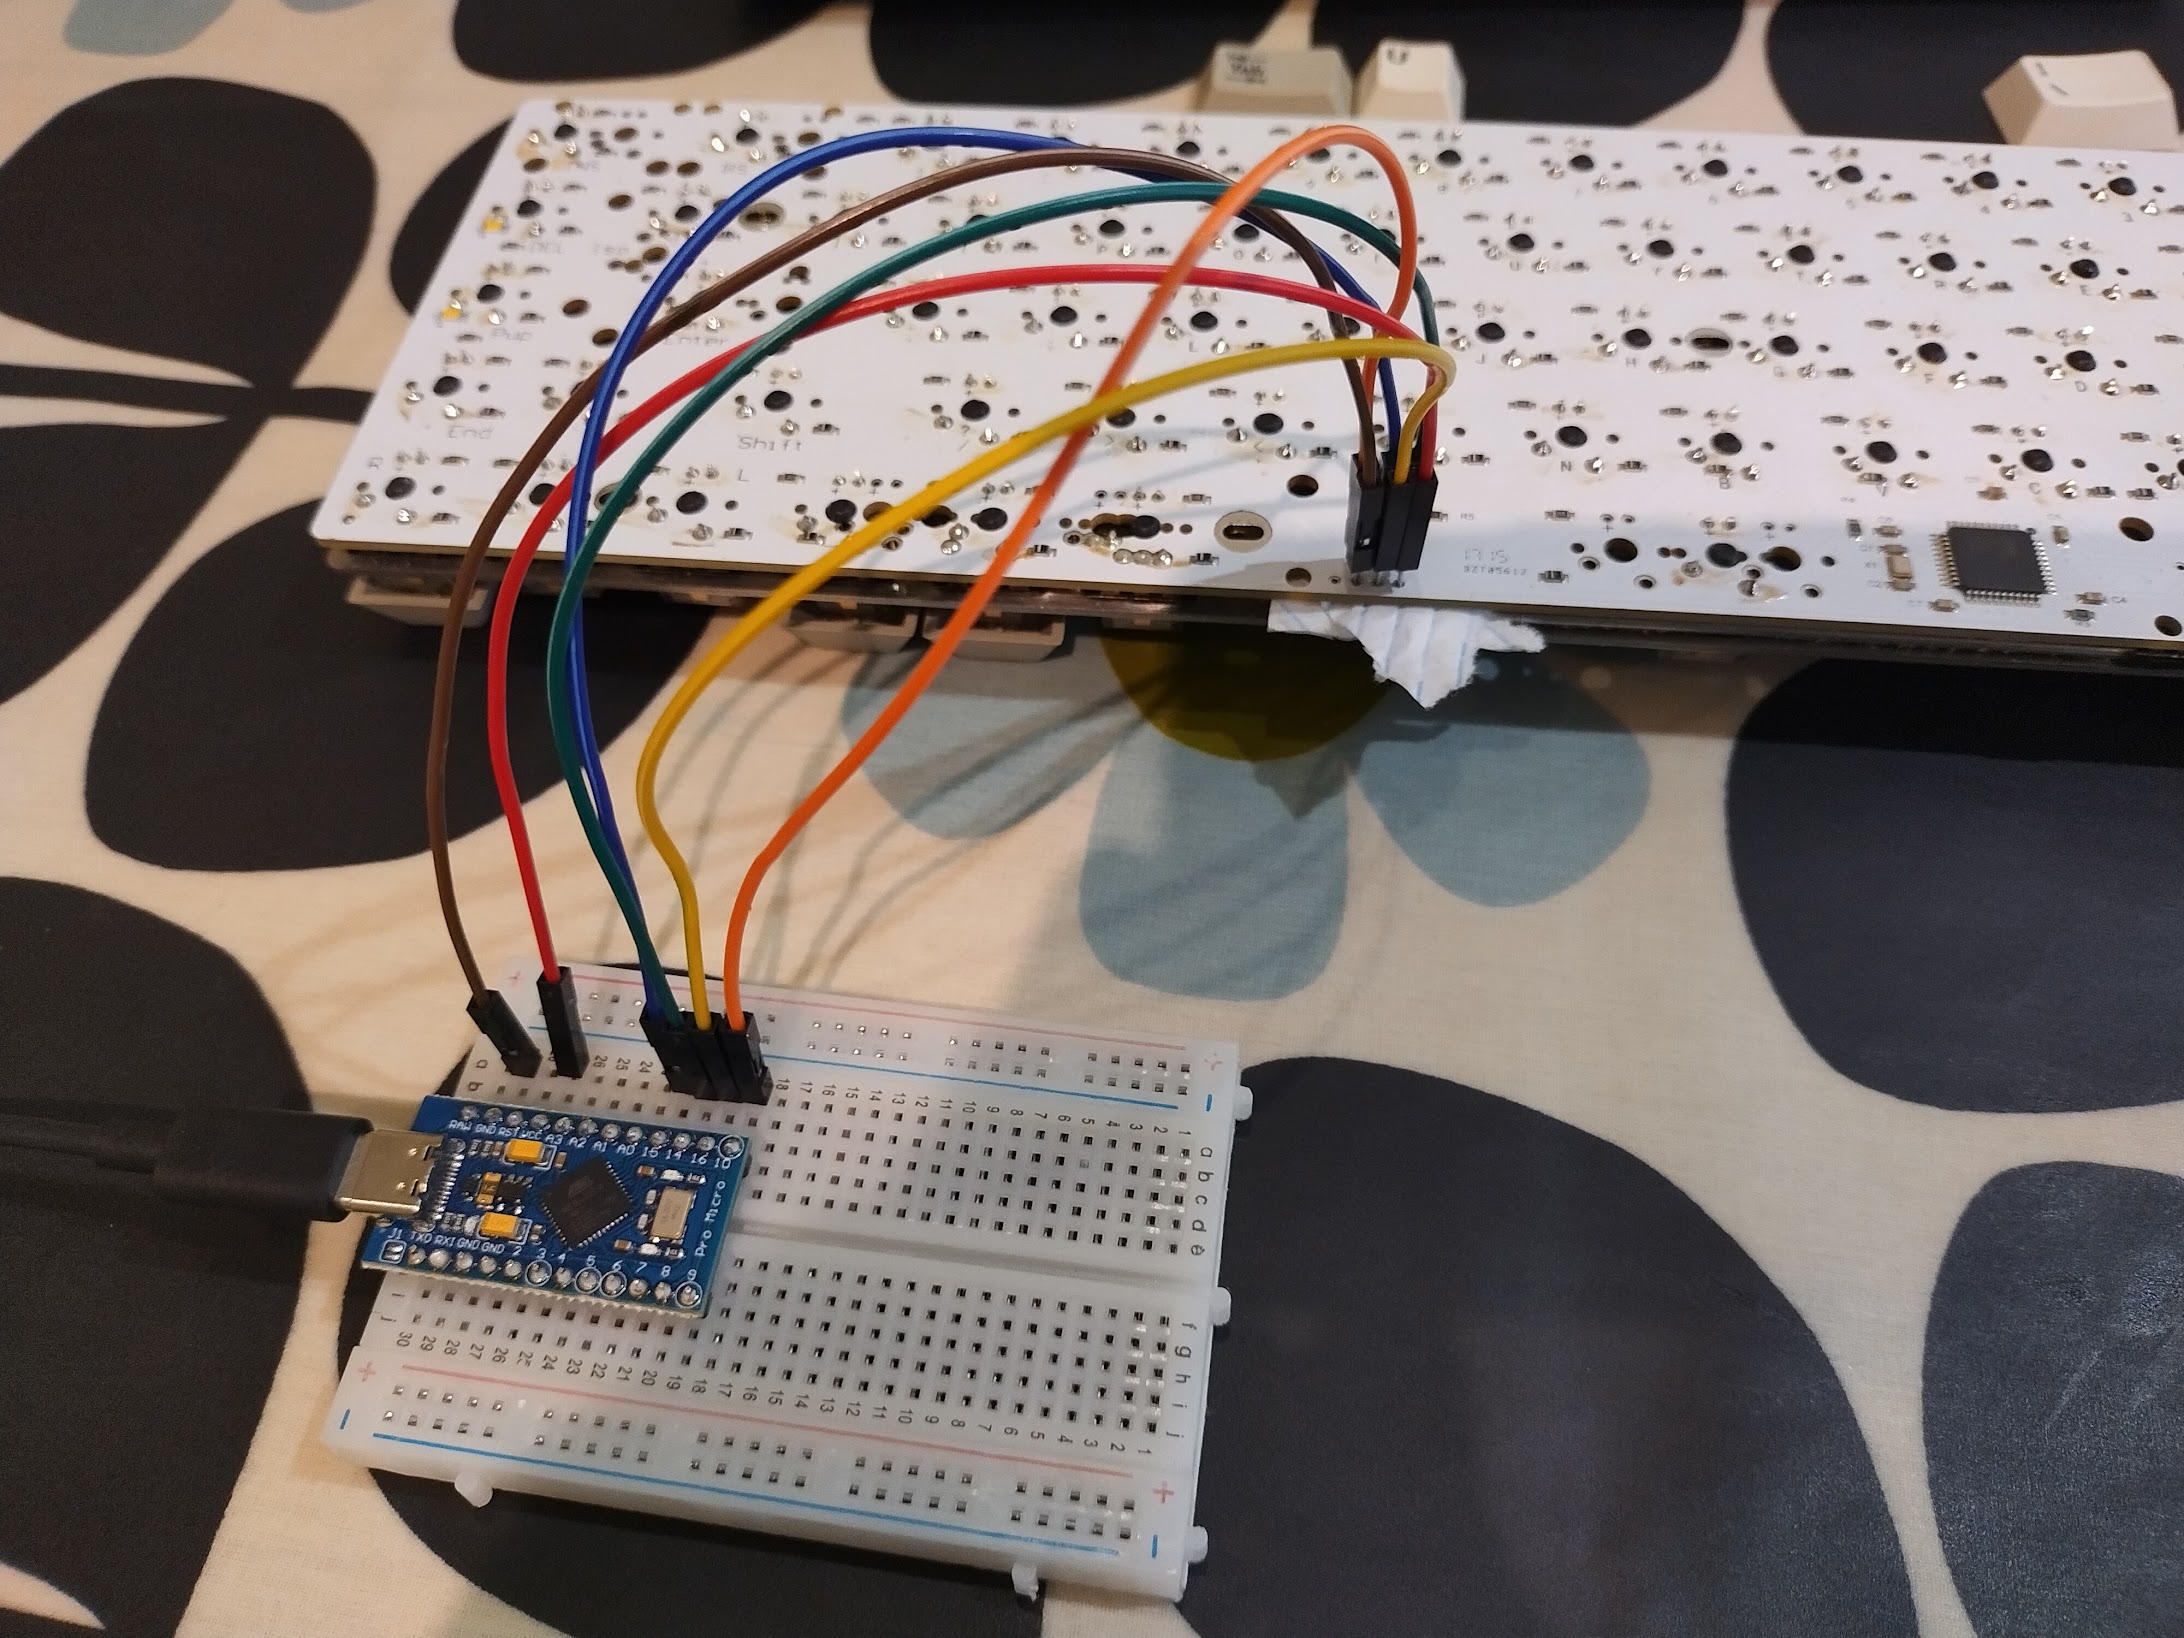
The cables should be connected to the following pins on the Pro Micro:
| Pro Micro | Keyboard |
|---|---|
| VCC | VCC |
| GND | Ground |
| 10 | RESET |
| 15 | SCK |
| 16 | MOSI |
| 14 | MISO |
The rig should look something like this:
Test your setup with avrdude
Connect the Pro Micro to your computer with a USB cable. Now test you can communicate with the Tada68 PCB over the ISP connection:
$ sudo avrdude -p atmega32u4 -c avrisp -P /dev/ttyACM0 -v
If your setup is correct you should see output like the following:
avrdude: AVR device initialized and ready to accept instructions

Reading | ################################################## | 100% 0.01s

avrdude: Device signature = 0x1e9587 (probably m32u4)
avrdude: safemode: lfuse reads as 5E
avrdude: safemode: hfuse reads as 99
avrdude: safemode: efuse reads as F3

avrdude: safemode: lfuse reads as 5E
avrdude: safemode: hfuse reads as 99
avrdude: safemode: efuse reads as F3
avrdude: safemode: Fuses OK (E:F3, H:99, L:5E)

avrdude done.  Thank you.
Reflashing the LUFA mass storage bootloader
Some people have reported that they have successfully unbricked their Tada68 by reflashing the stock mass storage bootloader. This did not work for me, but you might want to try this before trying a different bootloader.
Clone the rwilbur/tada68-bootloader-restore repo and flash using avrdude:
$ git clone https://github.com/rwilbur/tada68-bootloader-restore.git
$ cd tada68-bootloader-restore/
$ sudo avrdude -p atmega32u4 -c avrisp -P /dev/ttyACM0 -U flash:w:mass_bootloader_tada68.hex
If successful you should see output similar to:
avrdude: AVR device initialized and ready to accept instructions

Reading | ################################################## | 100% 0.01s

avrdude: Device signature = 0x1e9587 (probably m32u4)
avrdude: NOTE: "flash" memory has been specified, an erase cycle will be performed
     	To disable this feature, specify the -D option.
avrdude: erasing chip
avrdude: reading input file "mass_bootloader_tada68.hex"
avrdude: input file mass_bootloader_tada68.hex auto detected as raw binary
avrdude: writing flash (32768 bytes):

Writing | ################################################## | 100% 18.44s

avrdude: 32768 bytes of flash written
avrdude: verifying flash memory against mass_bootloader_tada68.hex:
avrdude: load data flash data from input file mass_bootloader_tada68.hex:
avrdude: input file mass_bootloader_tada68.hex auto detected as raw binary
avrdude: input file mass_bootloader_tada68.hex contains 32768 bytes
avrdude: reading on-chip flash data:

Reading | ################################################## | 100% 10.77s

avrdude: verifying ...
avrdude: 32768 bytes of flash verified

avrdude: safemode: Fuses OK (E:F3, H:99, L:5E)

avrdude done.  Thank you.
You can now unplug the Pro Micro and disconnect the jumper cables, and connect the Tada68 to your computer using a USB cable and try flashing your keyboard firmware to the Tada68 by pressing the reset buttom and waiting for it to appear as a storage device.
Flashing the Atmel DFU bootloader
The LUFA mass storage bootloader is very unreliable, so you might want to consider flashing the Atmel DFU bootloader instead. This is a bootloader developed by Atmega (now called Microchip), and is generally considered to be the most reliable bootloader for AVR microcontrollers.
Note, there are various bootloaders available for AVR MCUs. For a description of these, see QMK’s flashing and bootloader information page.
First, download the bootloader hex files from the Microship website:
$ wget https://ww1.microchip.com/downloads/en/DeviceDoc/megaUSB_DFU_Bootloaders.zip -O /tmp/megaUSB_Bootloaders.zip
$ unzip /tmp/megaUSB_Bootloaders.zip
Now flash using avrdude, being careful to flash the atmega32u4 hex file:
$ sudo avrdude -p atmega32u4 -c avrisp -P /dev/ttyACM0 -U flash:w:/tmp/ATMega32U4-usbdevice_dfu-1_0_0.hex
If successful, you should see output like the following:
avrdude: AVR device initialized and ready to accept instructions

Reading | ################################################## | 100% 0.01s

avrdude: Device signature = 0x1e9587 (probably m32u4)
avrdude: NOTE: "flash" memory has been specified, an erase cycle will be performed
     	To disable this feature, specify the -D option.
avrdude: erasing chip
avrdude: reading input file "/tmp/ATMega32U4-usbdevice_dfu-1_0_0.hex"
avrdude: input file /tmp/ATMega32U4-usbdevice_dfu-1_0_0.hex auto detected as Intel Hex
avrdude: writing flash (32768 bytes):

Writing | ################################################## | 100% 0.00s

avrdude: 32768 bytes of flash written
avrdude: verifying flash memory against /tmp/ATMega32U4-usbdevice_dfu-1_0_0.hex:
avrdude: load data flash data from input file /tmp/ATMega32U4-usbdevice_dfu-1_0_0.hex:
avrdude: input file /tmp/ATMega32U4-usbdevice_dfu-1_0_0.hex auto detected as Intel Hex
avrdude: input file /tmp/ATMega32U4-usbdevice_dfu-1_0_0.hex contains 32768 bytes
avrdude: reading on-chip flash data:

Reading | ################################################## | 100% 0.00s

avrdude: verifying ...
avrdude: 32768 bytes of flash verified

avrdude: safemode: Fuses OK (E:F3, H:99, L:5E)

avrdude done.  Thank you.
You can now unplug the Pro Micro and disconnect the jumper cables from the PCB. If you now connect the Tada68 to your computer with a USB cable you should see the following in the kernel log:
Mar 31 22:48:57 seg kernel: [20449.798210] usb 4-1: new full-speed USB device number 17 using uhci_hcd
Mar 31 22:48:57 seg kernel: [20449.994550] usb 4-1: New USB device found, idVendor=03eb, idProduct=2ff4, bcdDevice= 0.00
Mar 31 22:48:57 seg kernel: [20449.994569] usb 4-1: New USB device strings: Mfr=1, Product=2, SerialNumber=3
Mar 31 22:48:57 seg kernel: [20449.994578] usb 4-1: Product: ATm32U4DFU
Mar 31 22:48:57 seg kernel: [20449.994585] usb 4-1: Manufacturer: ATMEL
Mar 31 22:48:57 seg kernel: [20449.994591] usb 4-1: SerialNumber: 1.0.0
All being well, you can now flash your keyboard firmware to the Tada68 using the
dfu-programmer command. Note you will need your firmware in hex file format
file rather than the BIN file format the mass storage bootloader used. I had to
add the following to my rules.mk file to get QMK to correctly generate a hex
file:
BOOTLOADER = atmel-dfu
Flash the firmware using dfu-programmer:
$ dfu-programmer atmega32u4 erase
$ dfu-programmer atmega32u4 flash tada68_mykeymap.hex
Validating...
19310 bytes used (67.35%)
$ dfu-programmer atmega32u4 reset
The keyboard should now reset and appear to the OS as a keyboard:
Mar 31 23:18:26 seg kernel: [22218.474212] usb 4-1: new full-speed USB device number 19 using uhci_hcd
Mar 31 23:18:26 seg kernel: [22218.679266] usb 4-1: New USB device found, idVendor=5441, idProduct=0001, bcdDevice= 0.03
Mar 31 23:18:26 seg kernel: [22218.679278] usb 4-1: New USB device strings: Mfr=1, Product=2, SerialNumber=0
Mar 31 23:18:26 seg kernel: [22218.679284] usb 4-1: Product: TADA68
Mar 31 23:18:26 seg kernel: [22218.679289] usb 4-1: Manufacturer: TADA
Mar 31 23:18:26 seg kernel: [22218.814310] input: TADA TADA68 Keyboard as /devices/pci0000:00/0000:00:1a.1/usb4/4-1/4-1:1.1/0003:5441:0001.0021/input/input57
A note on fuses
When changing the bootloader on AVR microcontrollers you have to be careful to set the fuses correctly. Fuses are registers stored in non-volatile memory that determine the hardware configuration of an AVR microcontroller, like whether it has a bootloader, what speed and voltage it will runs at etc. Setting the fuses incorrectly can result in bricking the controller, which can only be recovered using high voltage programming.
The fuse values (usually high, low and extended) are visible in the output of
the avrdude command. For example, with the stock mass storage bootloader on
the Tada68, the fuses are (E:F3, H:99, L:5E). Luckily, the fuses needed for
the atmel-dfu bootloader are exactly the same as for the mass storage
bootloader, so I didn’t need to change these. However, if you decide to choose a
different bootloader you should check what fuses are required for it on the QMK
ISP flashing
guide. If they
need to be changed you can set them with the avrdude command.
References and credits
- How to un-brick Tada68 with Raspberry Pi Reddit post
- rwilbur’s Tada68-bootloader-restore GitHub repo
- Installing or unbricking a custom TADA68 bootloader using a Raspberry Pi
- Bricked TADA68 and How I Fixed it - A Novice’s Tale
- An example USBasp ISP programmer for sale on Ebay
- QMK ISP flashing guide
- QMK Flashing Instructions and Bootloader Information