TV gateway devices like HDHomerun and VBox TV Gateway make it possible to take live TV broadcasts from sources such as terrestrial DVB, cable or satellite and stream them across your home network to devices such as smart phones, tablets or computers.
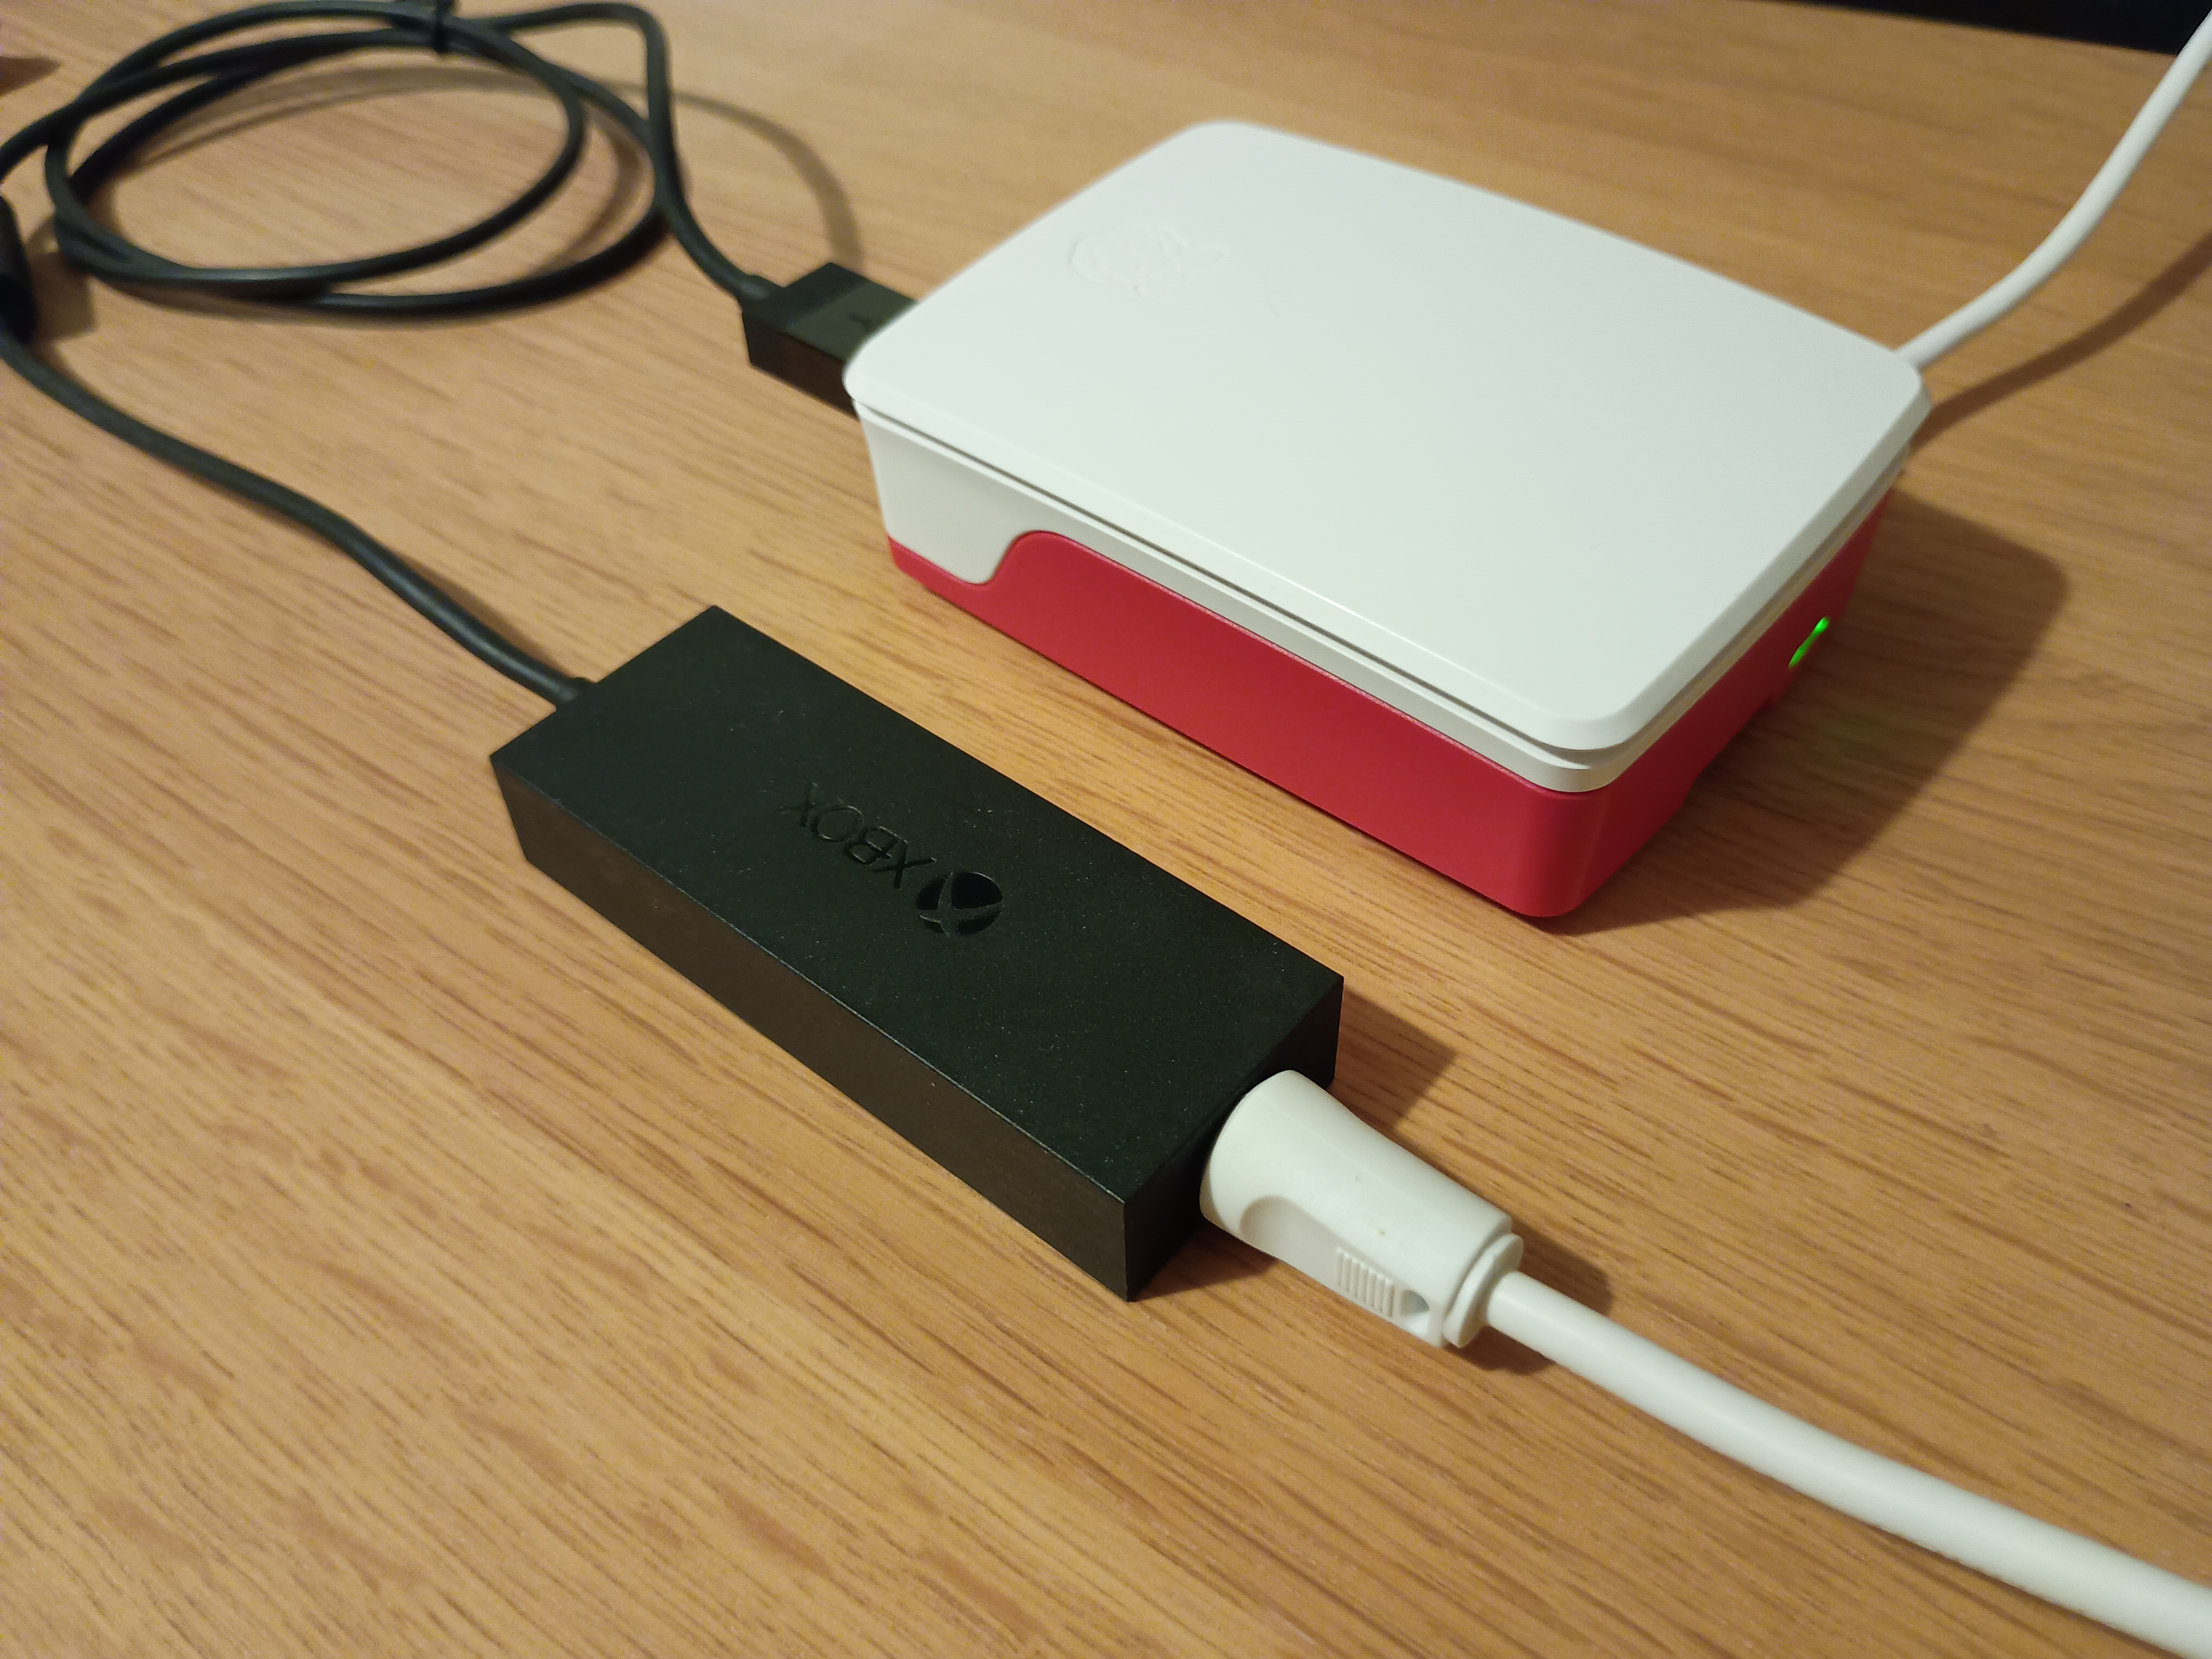
As a fun hack project, it is possible to make your own TV gateway using a Raspberry Pi, a digital TV tuner dongle, and a great piece of open source software called Tvheadend.
For this project I’m going to use:
-
A Raspberry Pi 5 with 4GB of RAM - Tvheadend will run perfectly fine on a RPi4 or even a RPi3, but I had a Raspberry Pi 5 lying around so I used that.
-
An XBox Digital TV tuner, which I picked up second hand on Ebay for ~£7
-
The Tvheadend TV streaming server software
There are other good options for TV tuners, such as the Hauppauge WinTV-dualHD. However, these cost in the region of £70 in the UK. It’s possible to pick up an XBox Digital TV tuner second hand from Ebay for £6-7, so I went with one of these. They work perfectly well with most Linux distros, and they’re so cheap it’s easy to buy two or three of them if needed.
Another option here is the Raspberry Pi TV HAT, which costs around £20 in the UK. With the right case this might make a nice neat setup.
I used Raspberry Pi OS for this project because I already had it installed on the MicroSD card in my Raspberry Pi, but other Linux distros should work just as well.
Getting the XBox Digital TV tuner working
Most linux distros include the necessary driver for the XBox TV tuner. However,
it does also need firmware to be uploaded to the device. You’ll need to download
the firmware and place it in the /lib/firmware/ directory before plugging the
dongle into the Pi’s USB port. You can download the firmware from
here.
wget https://github.com/armbian/firmware/raw/refs/heads/master/dvb-demod-mn88472-02.fw
mv dvb-demod-mn88472-02.fw /lib/firmware/
If you plug the XBox TV tuner into one of the Pi’s USB ports you should see something like the following:
[ 9398.811021] usb 1-2: new high-speed USB device number 3 using xhci-hcd
[ 9398.949486] usb 1-2: New USB device found, idVendor=045e, idProduct=02d5, bcdDevice= 1.10
[ 9398.949492] usb 1-2: New USB device strings: Mfr=1, Product=2, SerialNumber=3
[ 9398.949496] usb 1-2: Product: Xbox USB Tuner
[ 9398.949499] usb 1-2: Manufacturer: Microsoft Corp.
[ 9398.949501] usb 1-2: SerialNumber: 008691290814
[ 9398.950579] dvb-usb: found a 'Microsoft Xbox One Digital TV Tuner' in cold state, will try to load a firmware
[ 9398.950628] dvb-usb: downloading firmware from file 'dvb-usb-dib0700-1.20.fw'
[ 9399.022440] dib0700: firmware started successfully.
[ 9399.547287] dvb-usb: found a 'Microsoft Xbox One Digital TV Tuner' in warm state.
[ 9399.547403] dvb-usb: will pass the complete MPEG2 transport stream to the software demuxer.
[ 9399.547634] dvbdev: DVB: registering new adapter (Microsoft Xbox One Digital TV Tuner)
[ 9399.547639] usb 1-2: media controller created
[ 9399.547879] dvbdev: dvb_create_media_entity: media entity 'dvb-demux' registered.
[ 9399.730784] mn88472 15-0018: Panasonic MN88472 successfully identified
[ 9399.733910] tda18250 15-0060: NXP TDA18250BHN/M successfully identified
[ 9399.738094] usb 1-2: DVB: registering adapter 0 frontend 0 (Panasonic MN88472)...
[ 9399.738106] dvbdev: dvb_create_media_entity: media entity 'Panasonic MN88472' registered.
[ 9399.738468] dvb-usb: Microsoft Xbox One Digital TV Tuner successfully initialized and connected.
Connect an aerial cable from your aerial to the aerial port on the XBox TV tuner.
You can test the tuner is working using the w_scan utility:
w_scan -ft -cGB
...
482000: (time: 00:06.323)         signal ok:	QAM_AUTO f = 482000 kHz I999B8C999D999T999G999Y999 (0:0:0)
If you see lines in your output saying signal ok then the tuner is
successfully picking up a DVB-T signal. If you don’t then it isn’t, and
something is wrong with your setup.
Installing Tvheadend
Create the iptv user on the host
Tvheadend will be running in a docker container, so it’s not essential for the
iptv user to exist on the host, but it we will be mapping a volume from the
host to the container and so it will be useful to map the UIDs of the files that
Tvheadend will create to a user that exists on the host. Create the user like
so:
sudo useradd -d /home/iptv -s /usr/sbin/nologin -u 1001 -U iptv
echo "iptv:iptv" | sudo chpasswd
The second command here will change the password for the iptv user to iptv.
You may want to set it to something else. I think it may also be fine to lock
the password for the user. I haven’t tested that.
Create the directory structure for Tvheadend
I’m going to map two volumes from the host to the Tvheadend container: one for
its configuration and data files; and a second for it to store any recorded
content. I want these to live on the host in /var/local/iptv/TVHeadend, so
create the directory structure like so:
sudo mkdir -p /var/local/iptv/TVHeadend/{data,recordings}
sudo chown -R iptv:iptv /var/local/iptv
Prepare a docker compose config file
As mentioned already, I will be running Tvheadend as a docker container, as this is probably the quickest and easiest way to get Tvheadend running. To do this, create a docker compose config file like so:
cat > docker-compose.yml <<EOF
version: "3.5"
services:
  tvheadend:
    image: linuxserver/tvheadend:arm64v8-latest
    container_name: tvheadend
    environment:
      - PUID=1001
      - PGID=1001
      - TZ=Etc/UTC
      - RUN_OPTS= #optional
    volumes:
      - /var/local/iptv/TVHeadend/data:/config
      - /var/local/iptv/TVHeadend/recordings:/recordings
    ports:
      - 9981:9981
      - 9982:9982
    devices:
      - /dev/dvb:/dev/dvb
    restart: unless-stopped
EOF
This will tell docker compose to create one container using the
linuxserver/tvheadend image from dockerhub. I’m using the image tag
arm64v8-latest because I’m using a Raspberry Pi 5, but you can change that if
you’re using a different platform.
As mentioned already, this will map two volumes into the container from the
data and recordings directories we created earlier. These will persist
across container restarts so we don’t lose our config when we reboot the host.
The config will also map the /dev/dvb device from the host, which is used to
communicate with the XBox TV tuner dongle, into the container so that Tvheadend
can use it as its tuner.
Finally, this will also map two ports from the host into the container, one for
port 9981, which is the HTTP port that we will use to access Tvheadend’s web
configurator; and port 9982, which is Tvheadend’s HTSP port. HTSP is the
hypertext streaming protocol that Tvheadend provides for streaming content.
Start Tvheadend container
We should now be able to start Tvheadend by doing:
docker-compose up -d
Configuring Tvheadend
Once the Tvheadend container has started you should now be able to access the
configuration interface in your browser at http://[IP address of your
rpi:9981/. You will probably want to give your Raspberry Pi a fixed IP address
and a DNS name to make it easier when configuring streaming clients, but I won’t
be covering that here.
Tvheadend’s configurator is not very user friendly, but once you understand a few basic concepts it’s not too difficult to get working.
Set a default language
Go to Configuration -> General -> Base
Under Web Interface Settings set Default language to your chosen language.
Also under Web Interface Settings set Default view level to Expert as some
of the options we need to set are only visible in the expert view.
Then under EPG Settings select English from the Available list, then click
the right arrow to add it to the Selected list.
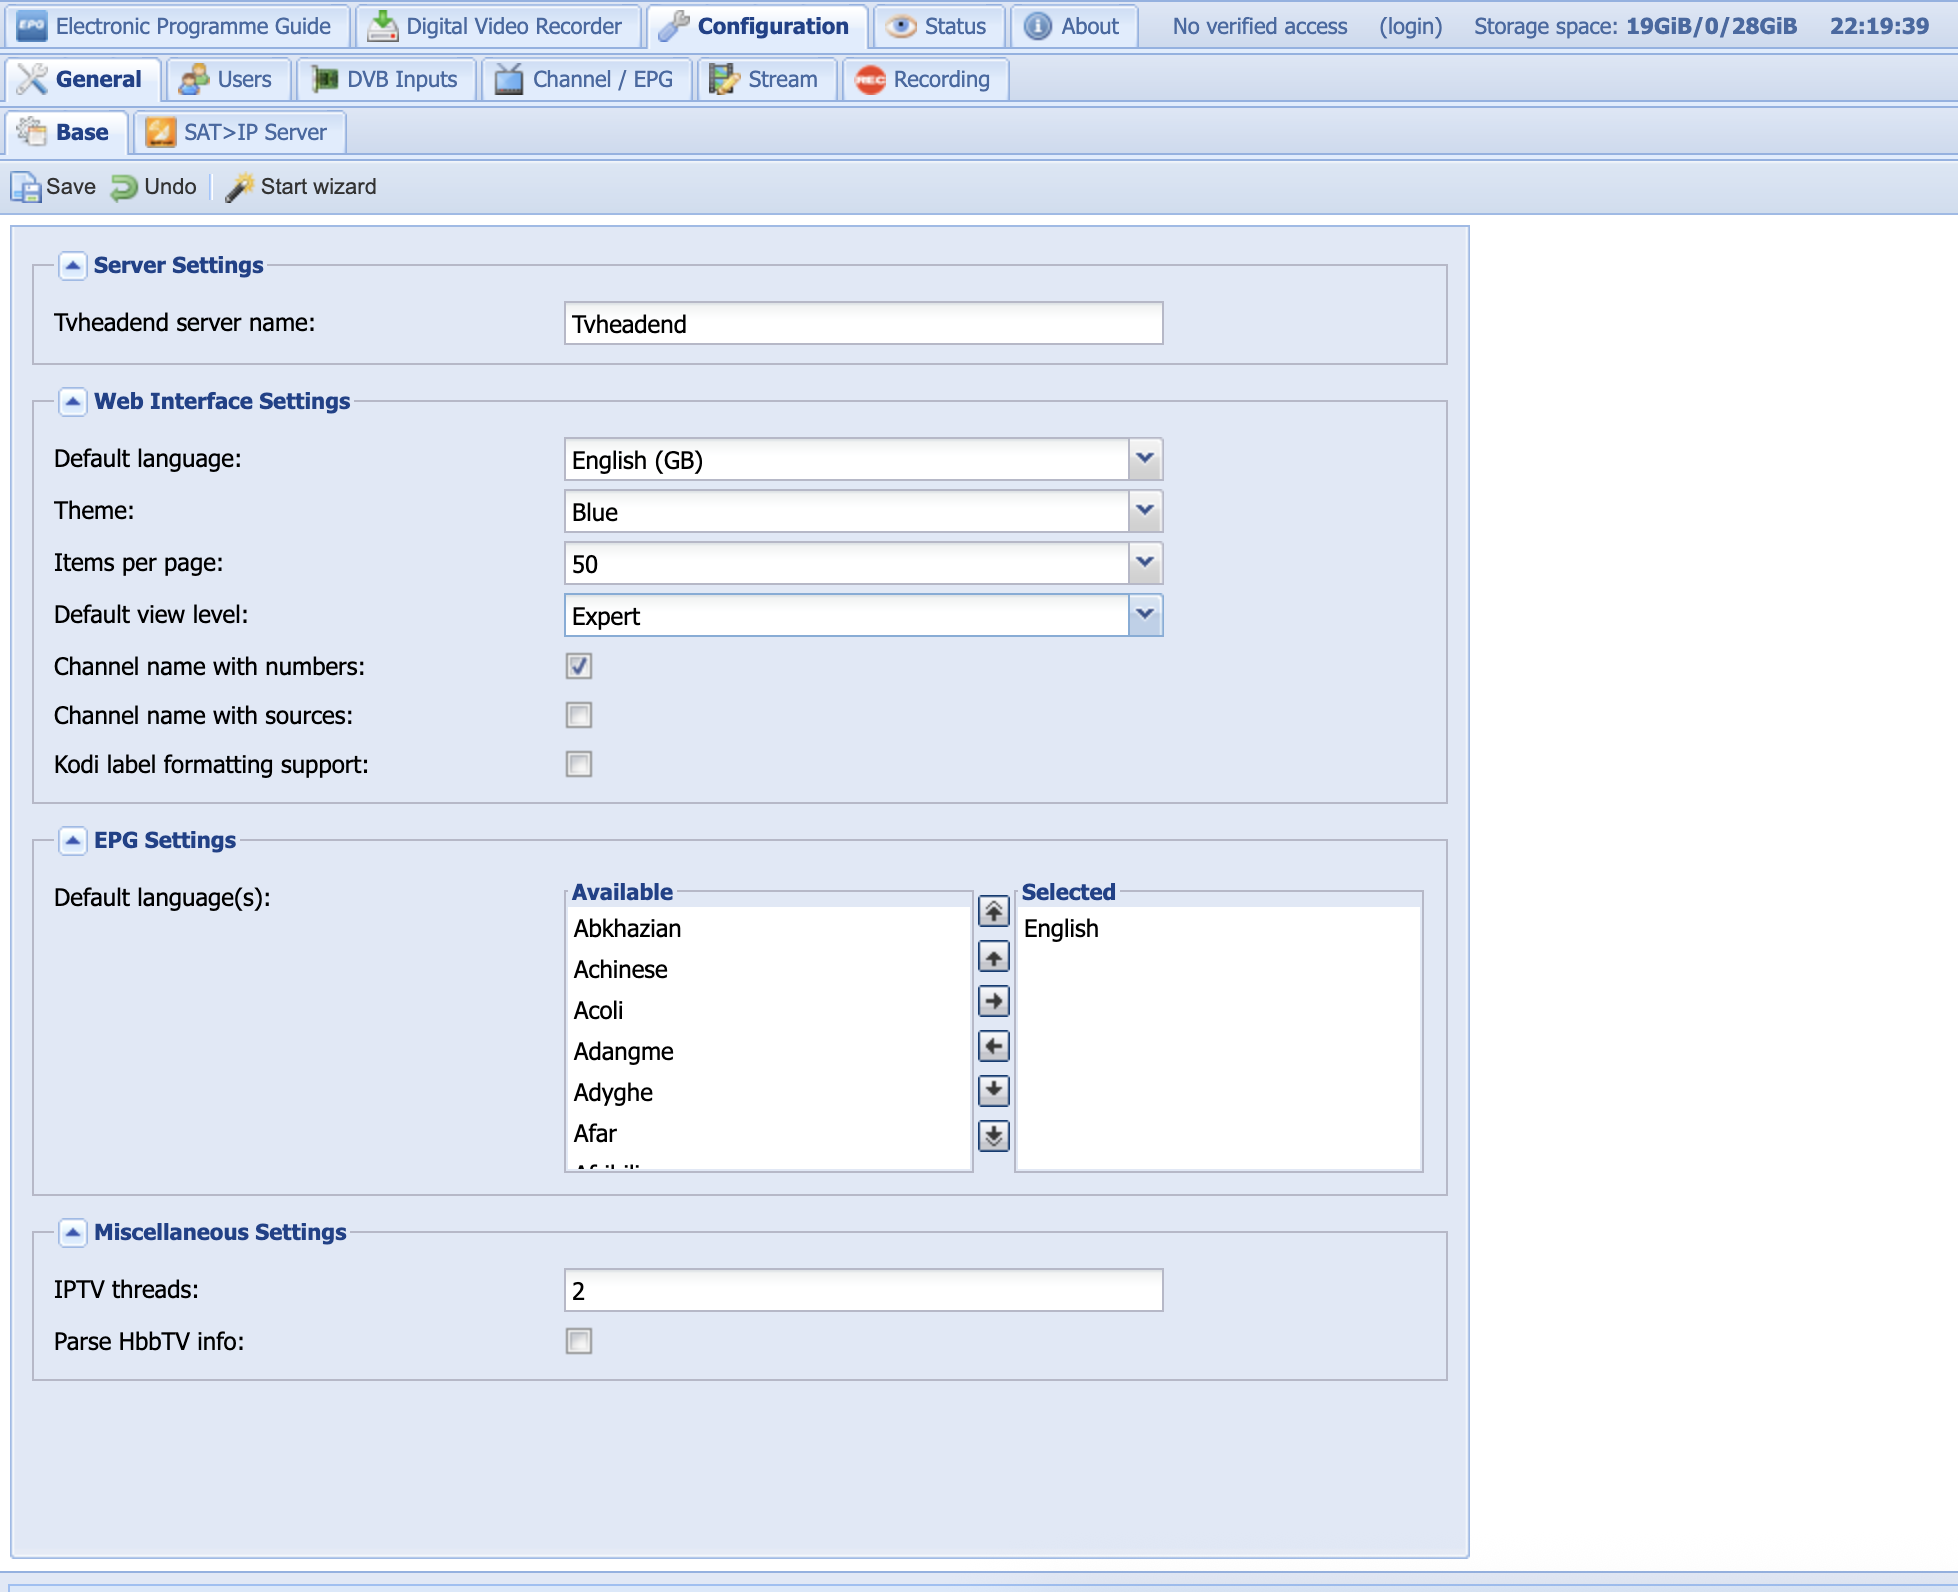
Be sure to click Save before moving onto the next step.
Add a user for streaming
It is possible to allow any client on your network to stream content from Tvheadend without authentication. However, it is recommended to add authentication credentials for each client.
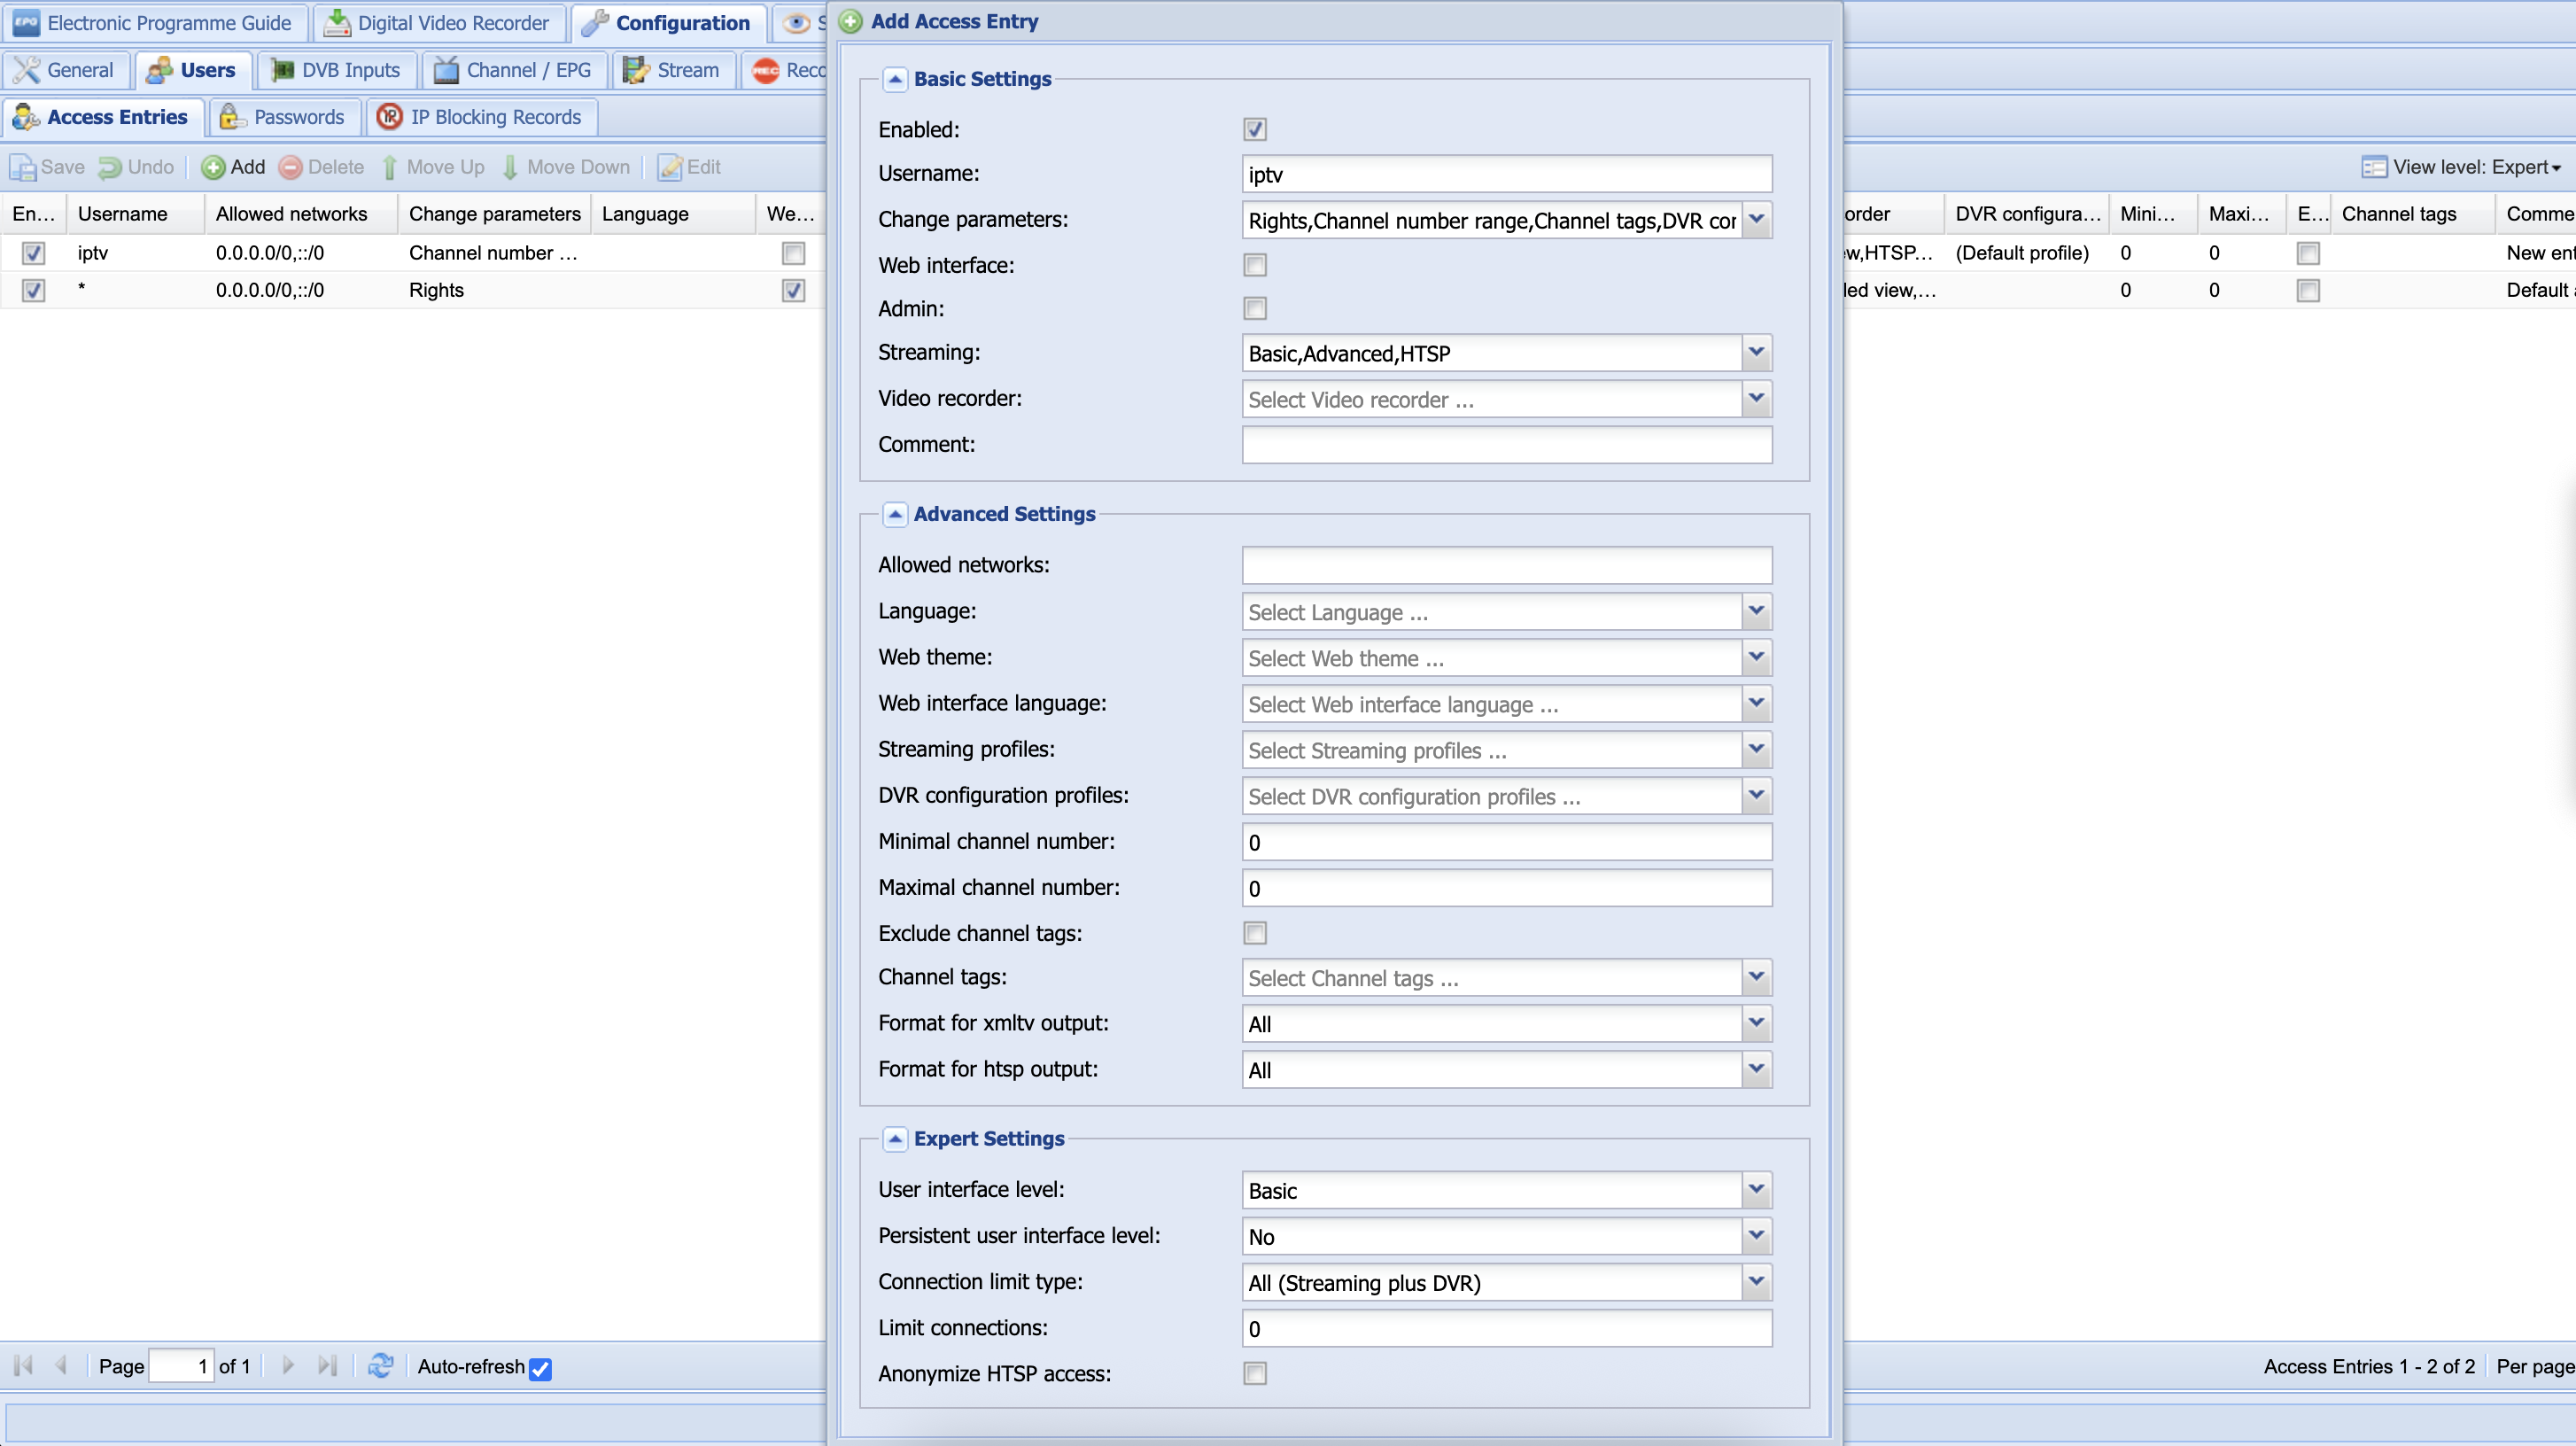
Go to Configuration -> Users -> Access Entries
Click the Add button. Set a username (I’ve used iptv here).
Select the drop-down list next to Change parameters and select the following
options: Rights, Channel number range, Channel tags, PVR configurations
and Streaming profiles.
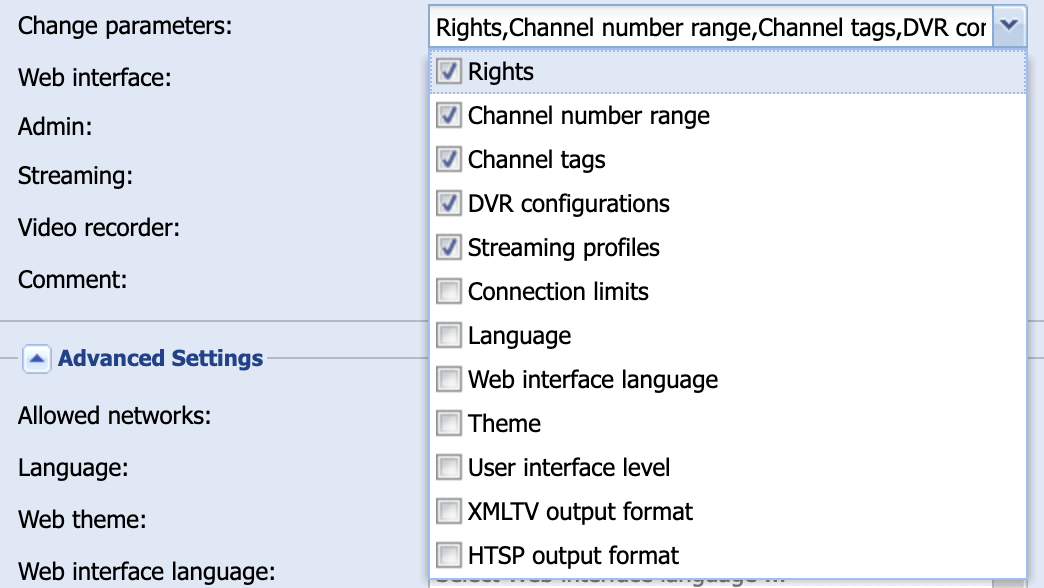
Select the checkbox next to Web interface. This will allow the user to access
the Tvheadend web interface, which we don’t need, but it also allows it to
access the electronic programme guide (EPG), which it will need.
Select the drop-down next to Streaming and select all thee options Basic,
Advanced and HTSP.

If you want the user to be able to pause and record content though Tvheadend’s
PVR functionality then you will want to select all the options under Video
recorder. I don’t have any proper storage attached to my Raspberry Pi at this
point so I’m not going to enable these.
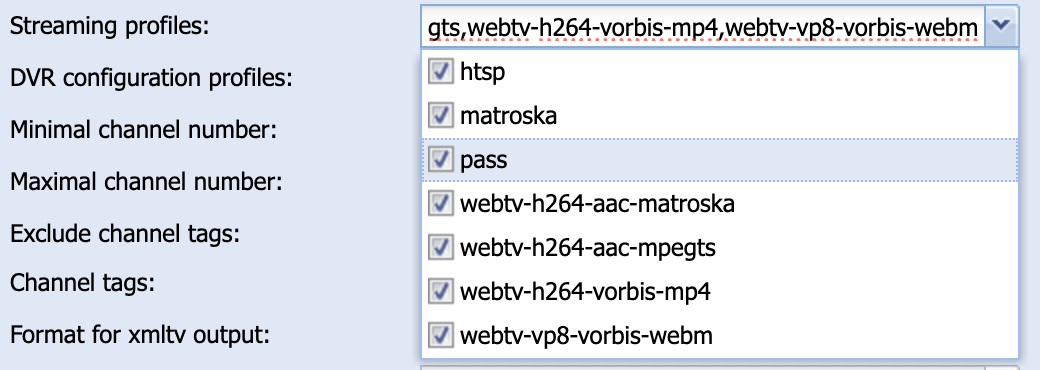
In the Streaming profiles drop-down, select all options.
Under DVR configuration profiles select (Default profile).
Click Apply at the bottom. A new row will appear in the access entries list.
You can click Cancel to close the new user dialog.
You now need to set a password for the new user. Click on the Passwords tab,
and then click the Add button.
The Username must match the username of the user you added above. Set the
Password to whatever you want. Then in the Persistent authentication select
Enable.
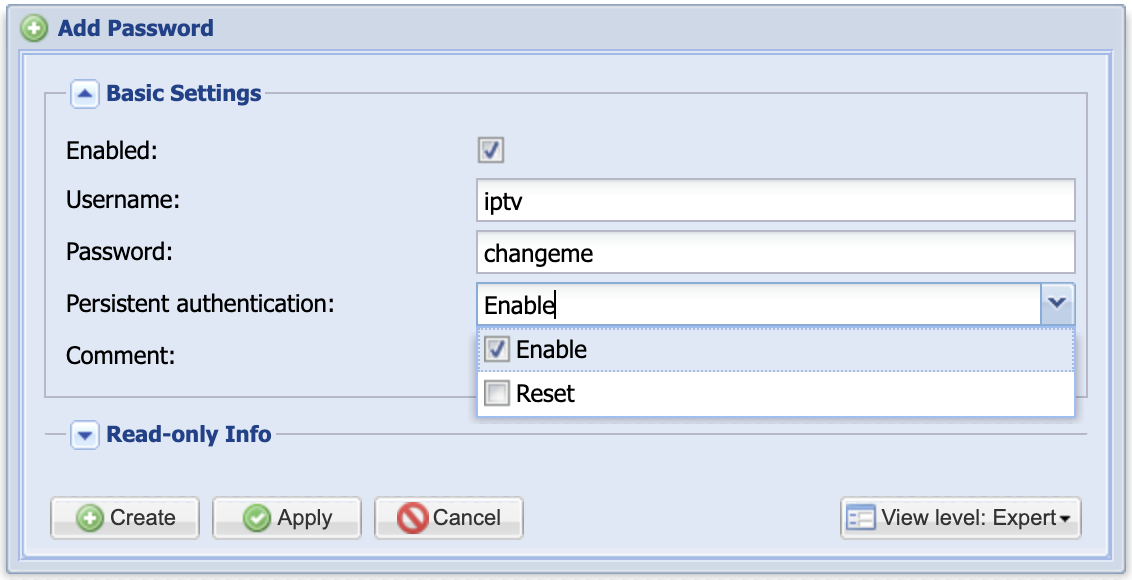
Click Apply, then OK, then Cancel.
Add a network
A network in Tvheadend is really a carrier network - a medium over which a signal is broadcast. For example, it could be a digital terrestrial broadcast (DVB-T or DVB-T2 in the UK or ATSC-T in the US), cable TV (DVB-C) or satellite (DVB-S). I’m using a DVB-T tuner, so I’ll be creating a DVB-T network.
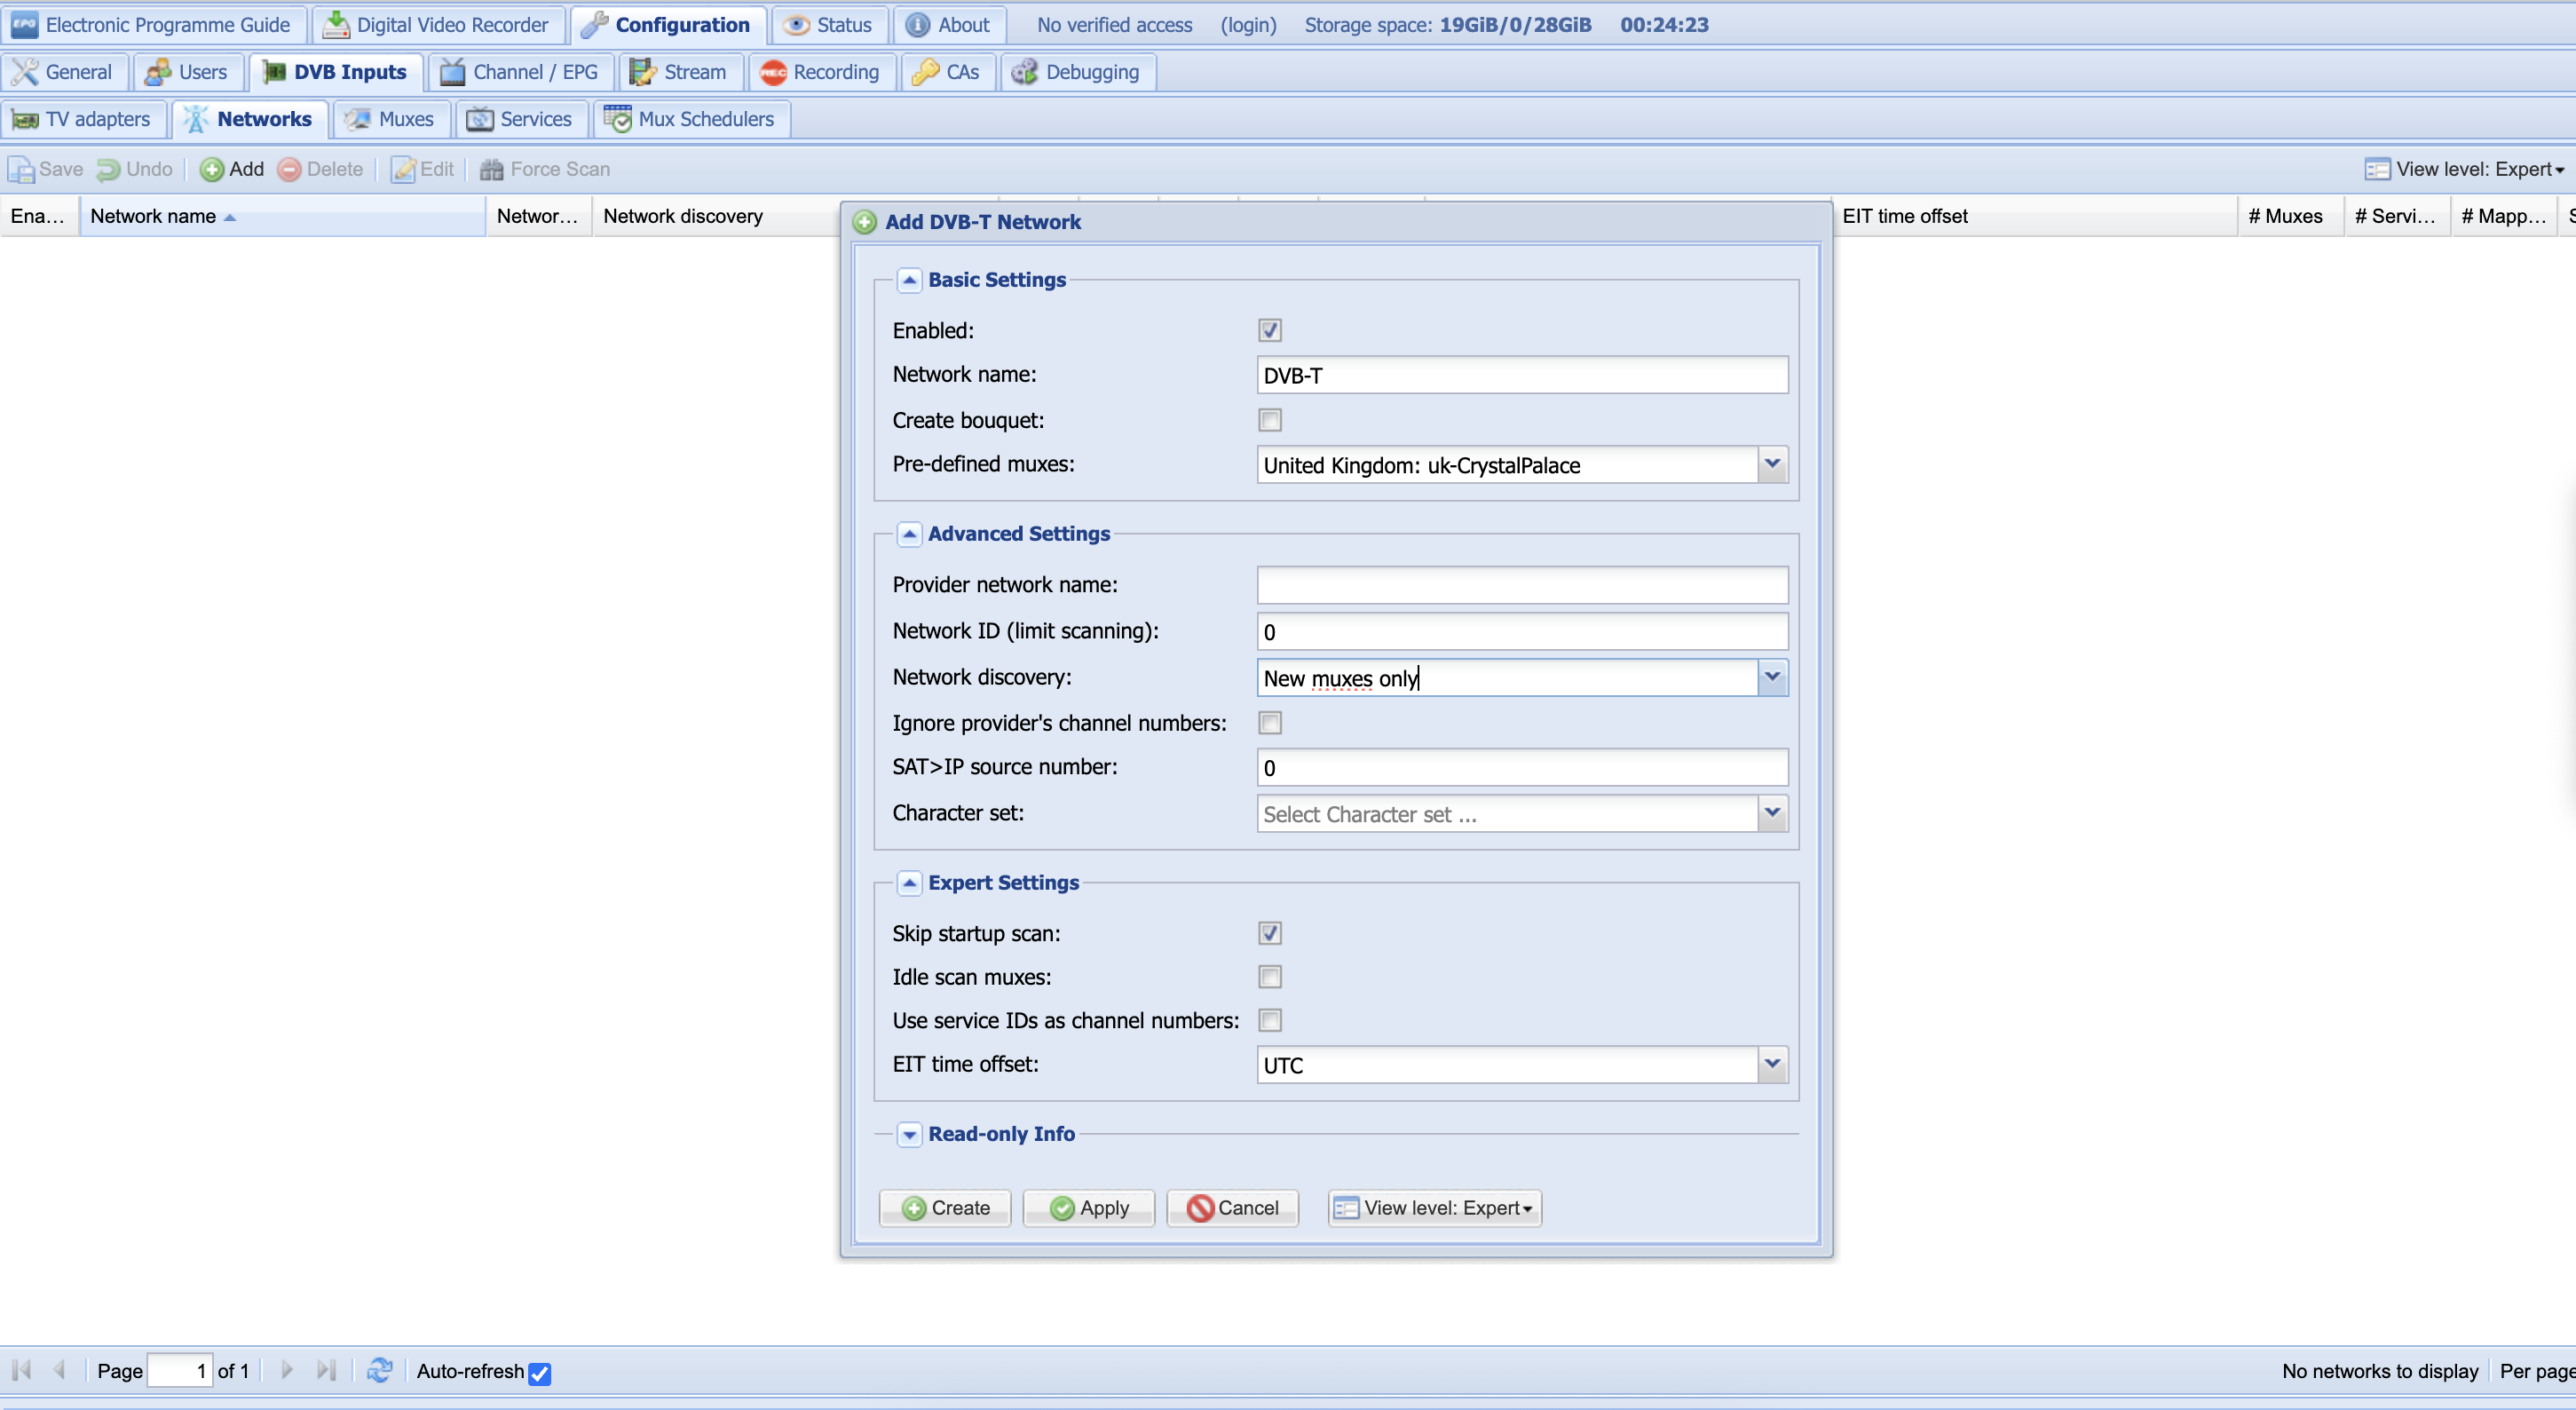
Go to Configuration -> DVB Inputs -> Networks.
Click the Add button and from the drop-down liast select DVB-T Network.
Under Basic Settings select the checkbox next to Enabled. Set a network
name; I’ve called mine DVB-T.
Now, from the Pre-defined muxes drop-down list select the profile that most
closely matches your country and transmitter. This is the most important bit of
the whole configuration to get right so it’s worth understanding what muxes are.
Muxes are channel frequencies transmitted on the carrier network. With digital
broadcasts, usually multiple services are multiplexed together on a single
frequency, hence the term mux.
It is really important to select the correct transmitter for your location. There are often several transmitters covering each area, but usually one will provide a stronger signal. If you are in the UK like me, the best way to find out which transmitter to use is to use the ukfree.tv website and clicking on some of the transmitters close to your location. This will show the coverage from each transmitter. Pick the one that provides the best coverage for your location. This is not always your nearest transmitter.
In my case I get the best signal from the Crystal Palace transmitter, so I
select United Kingdom: uk-CrystalPalace from the pre-defined muxes list.
The ukfree.tv website also provides details on the frequencies broadcast by
each transmitter and the services (or channels) multiplexed on each one. For
example, the details for the Crystal Palace transmitter can be seen
here.
Click Apply, then OK, then Cancel to close the dialog. You can see the
pre-defined muxes that have been created on the Muxes tab.
Associate the network with your adaptor
Assuming you’ve passed the device for your TV tuner dongle into the docker
container correctly, it should be visible in the TV adapters tab.
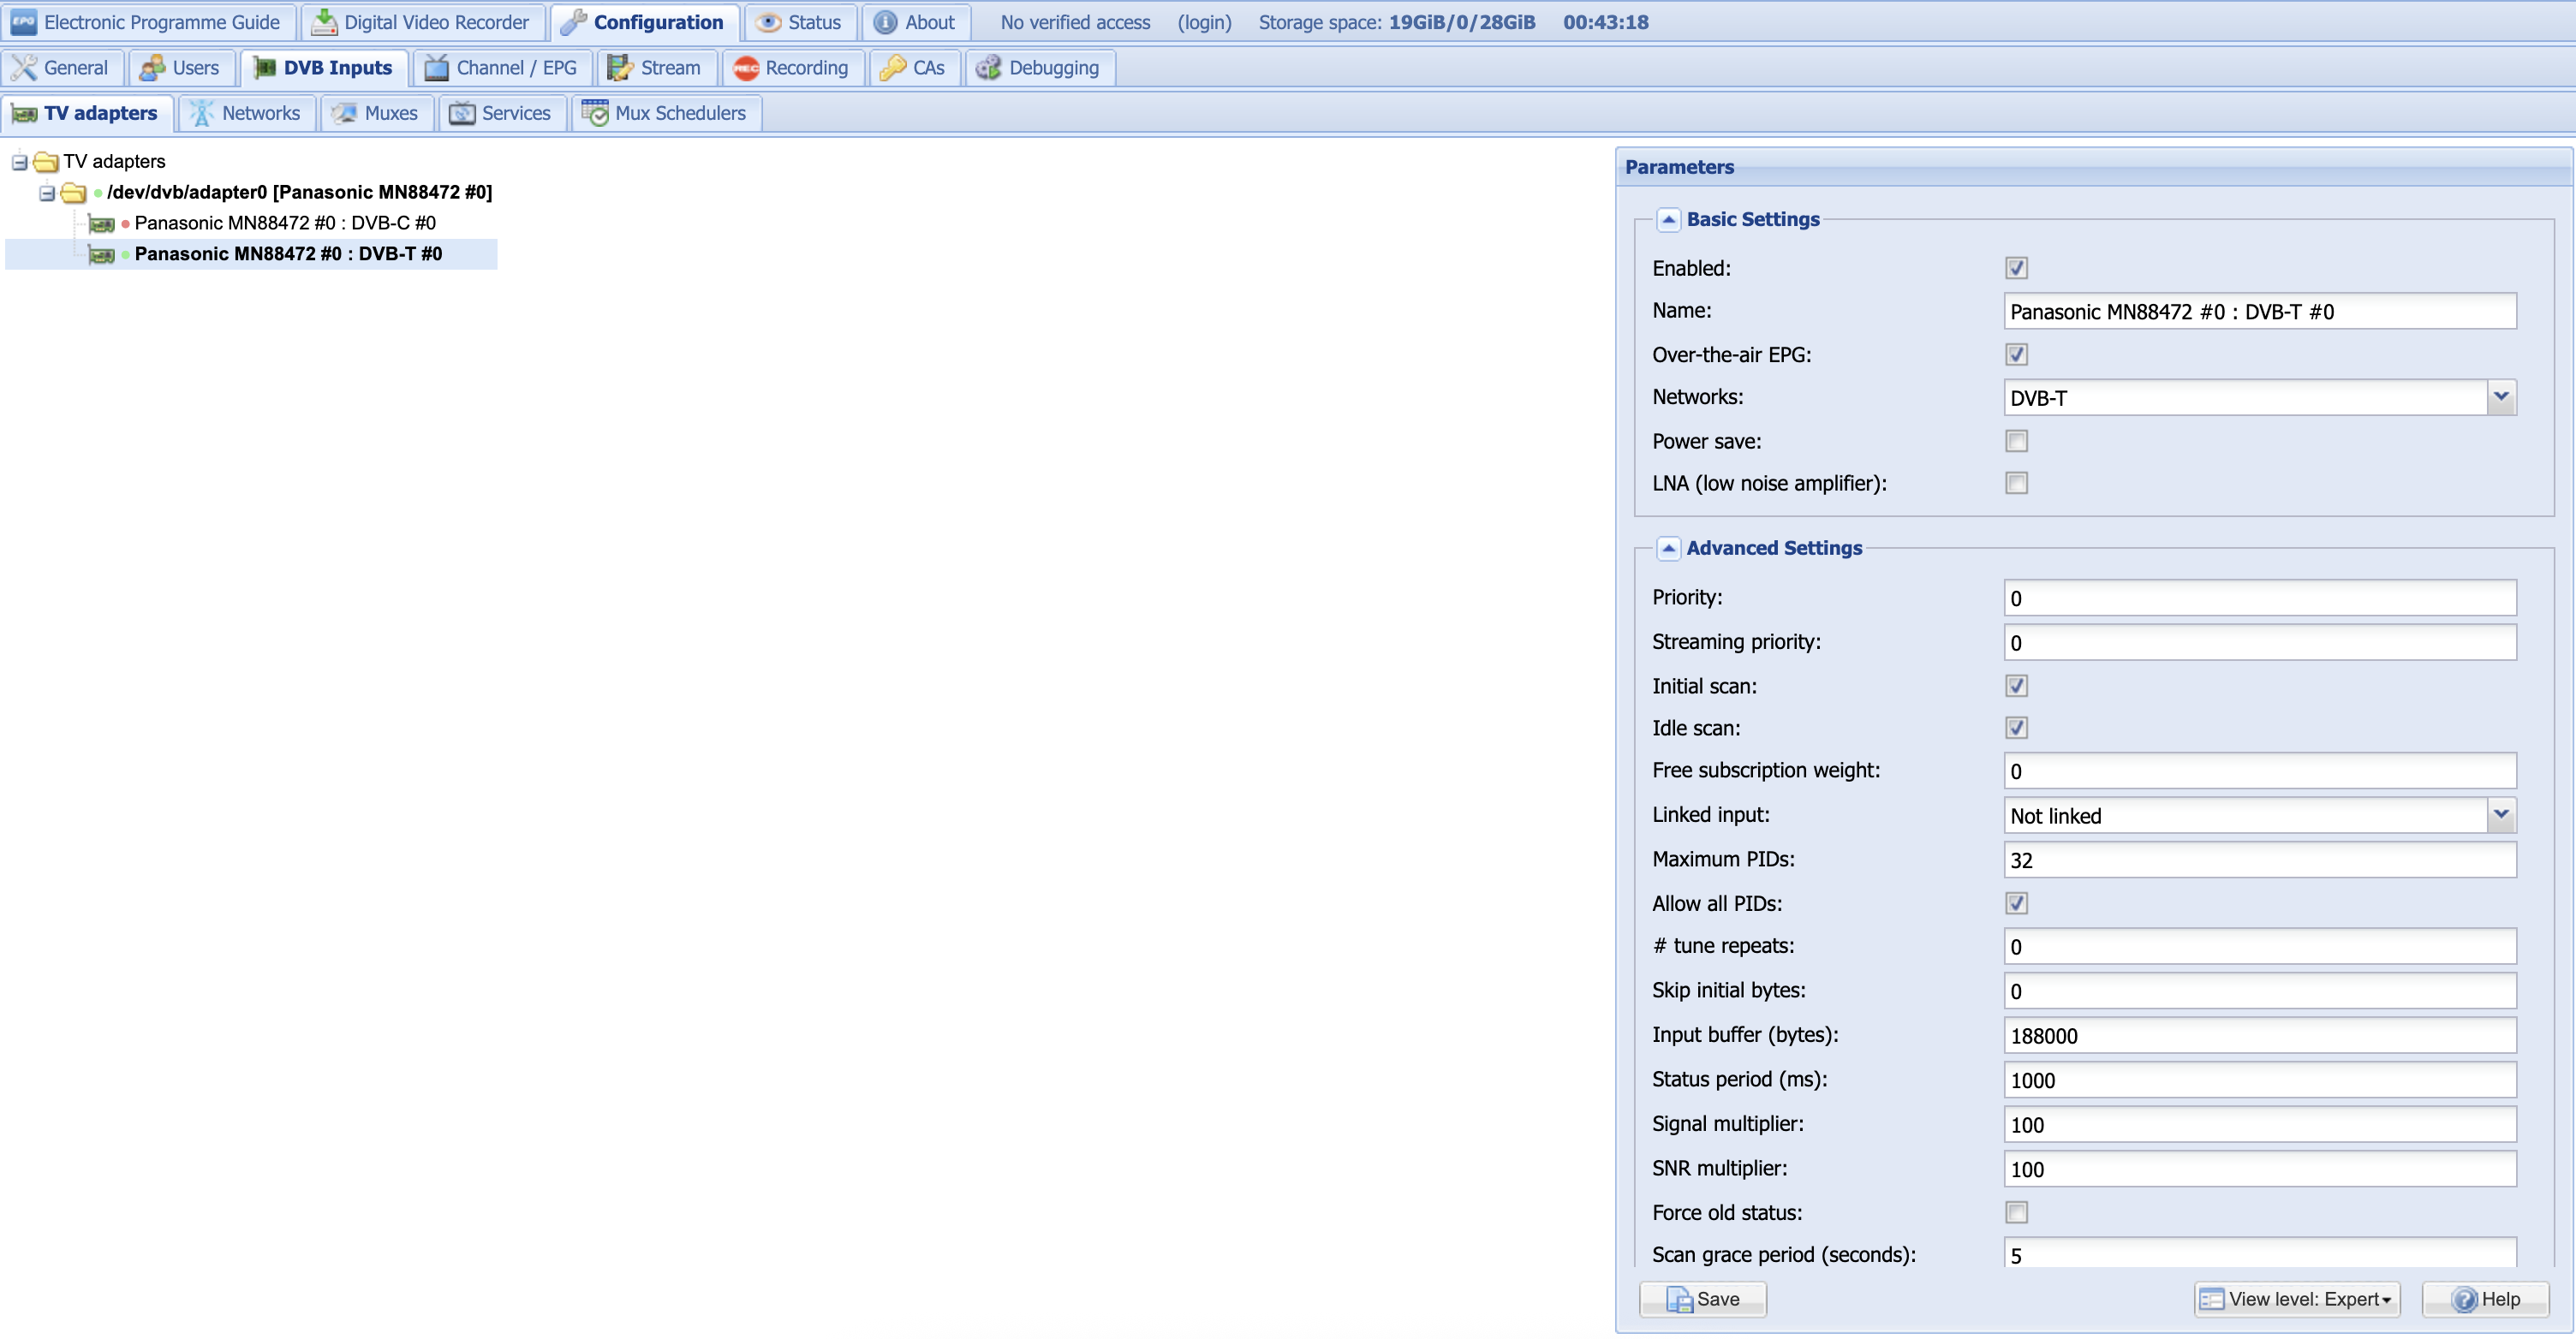
You must associate the network you configured above with the adapter. Click on the adapter from the list. Your dongle might provide devices for multiple mediums; mine provides both a DVB-T and a DVB-C device. Click the DVB-T device.
Click the checkbox next to Enabled. Then select the network you created above
from the Networks drop-down and click Save. The device should now appear as
bold.
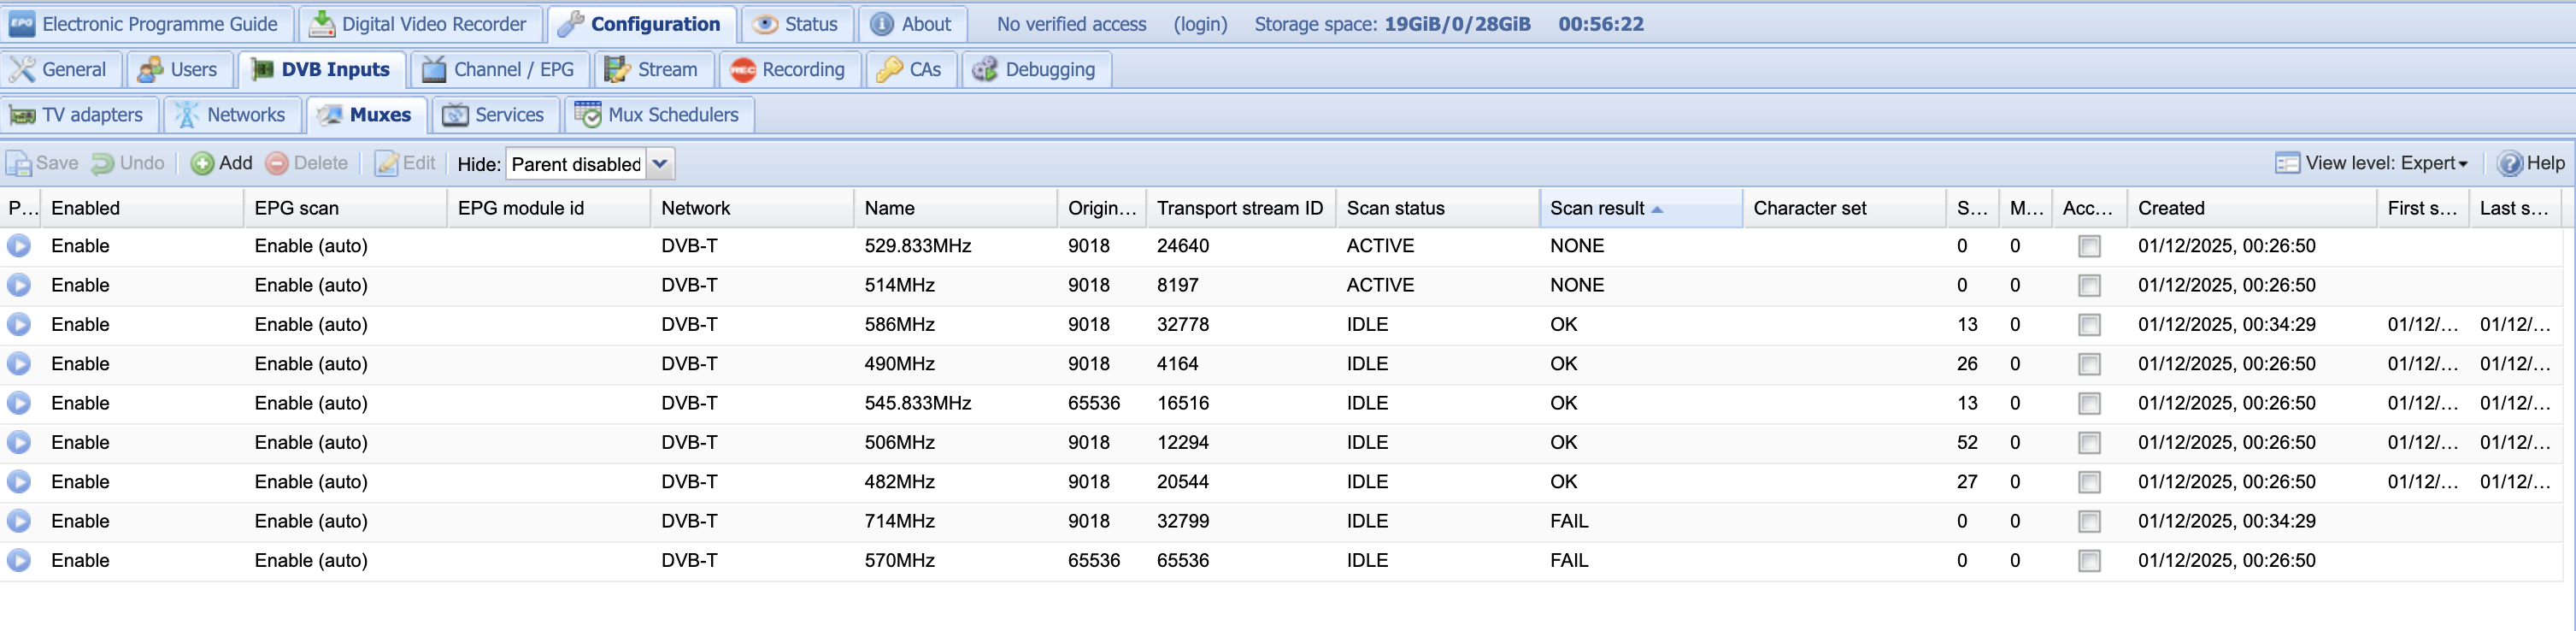
If everything is configured correctly, Tvheadend should now start scanning all
the muxes for services. If you click the Muxes tab you should see the Scan
status change from IDLE to ACTIVE.
It may take a minute or two for Tvheadend to complete the scan, but when
complete all muxes should have a Scan result of either OK or FAIL. If
you’ve chosen the right transmitter for your area most or all should be OK. If
not you may need to try a different transmitter.
Unsticking stuck muxes
Sometimes Tvheadend gets stuck scanning muxes. You can tell if there are stuck
muxes from the Networks tab by looking at the Scan queue column of the
network. If after several minutes this is anything other than zero you have
stuck muxes.
On the Muxes tab, you can identify which muxes are stuck. These will have a
scan status of ACTIVE and a scan result of NONE.
To unstick these stuck muxes, click on the stuck mux and click the Edit
button. In the Advanced Settings section change Scan status to IDLE and
click Apply. Now change Scan status to ACTIVE and click Apply, then
Save. The scan result for the mux should now change to either OK or
FAILED. Repeat for any other stuck muxes.
Map
services
If Tvheadend correctly scanned your muxes it should have found a number of services. A service in Tvheadend is a data stream that is multiplexed on a mux, which could be a TV channel, a radio channel or digital teletext. Before we can watch a TV channel, we first must map our services to channels.
Go to Configuration -> Channel / EPG -> Channels, then select the Map
services drop-down and select Map all services.
In the dialog, it’s a good idea to tick the Merge same name option to avoid
mapping channels multiple times. Also, tick the Create type-based tags,
Create provider name tags and Create network name tags options.
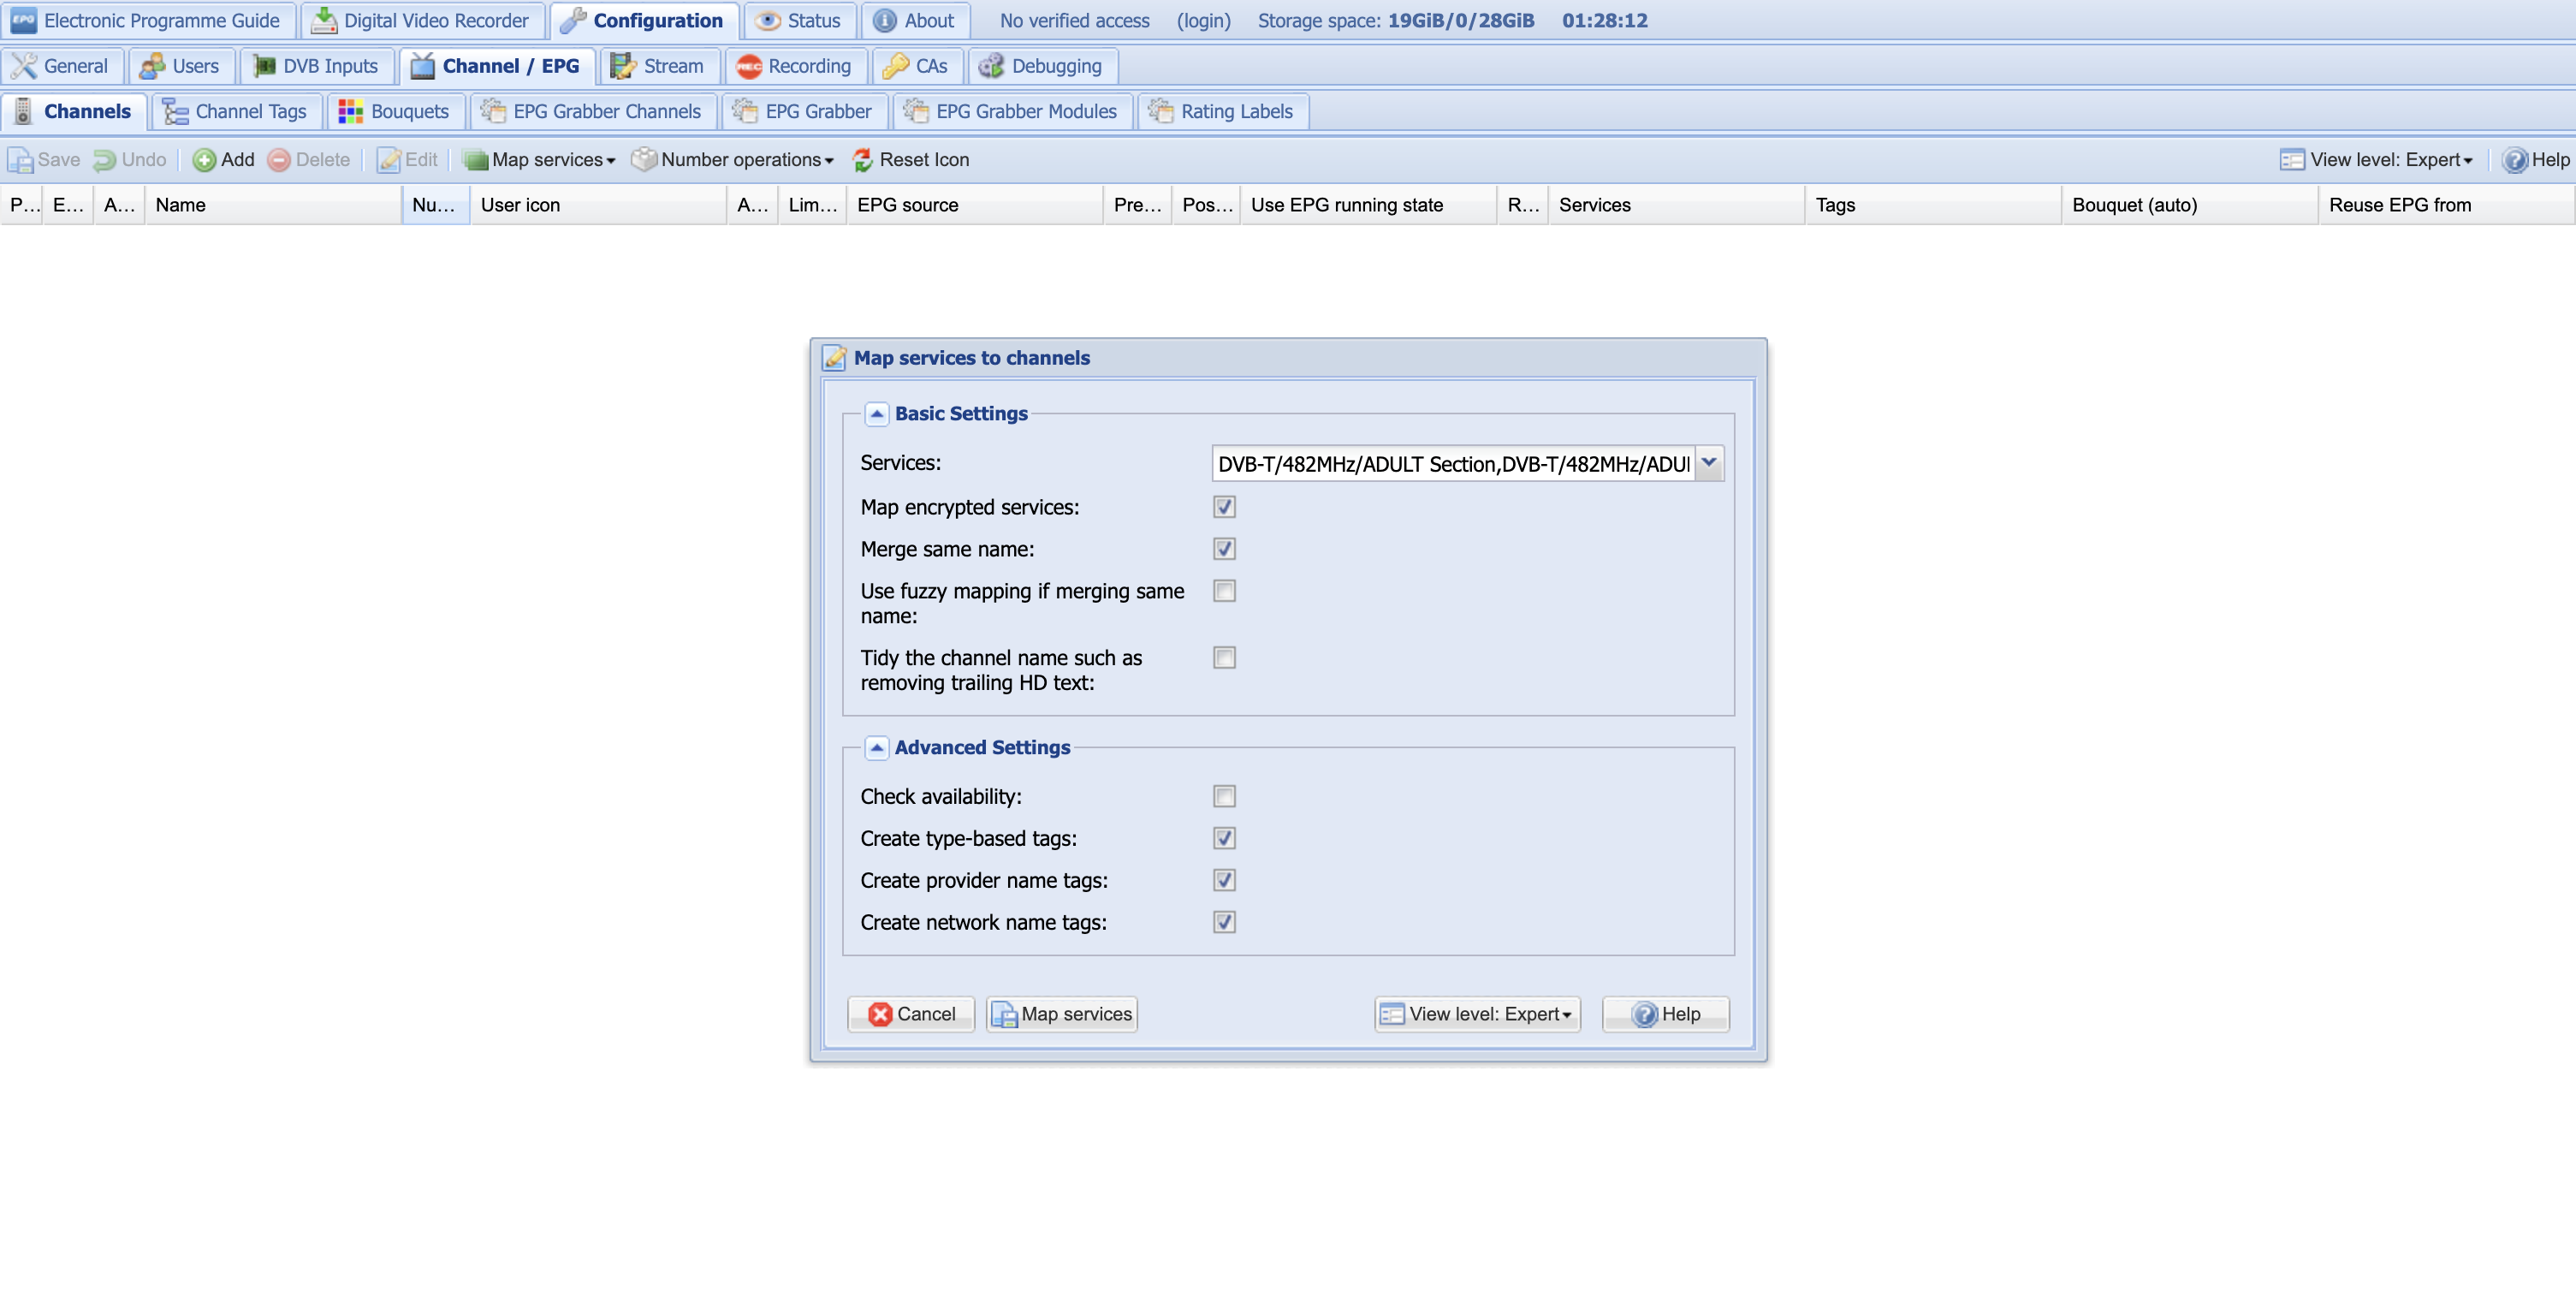
Click Map services. A Service Mapper tab should appear with a progress bar.
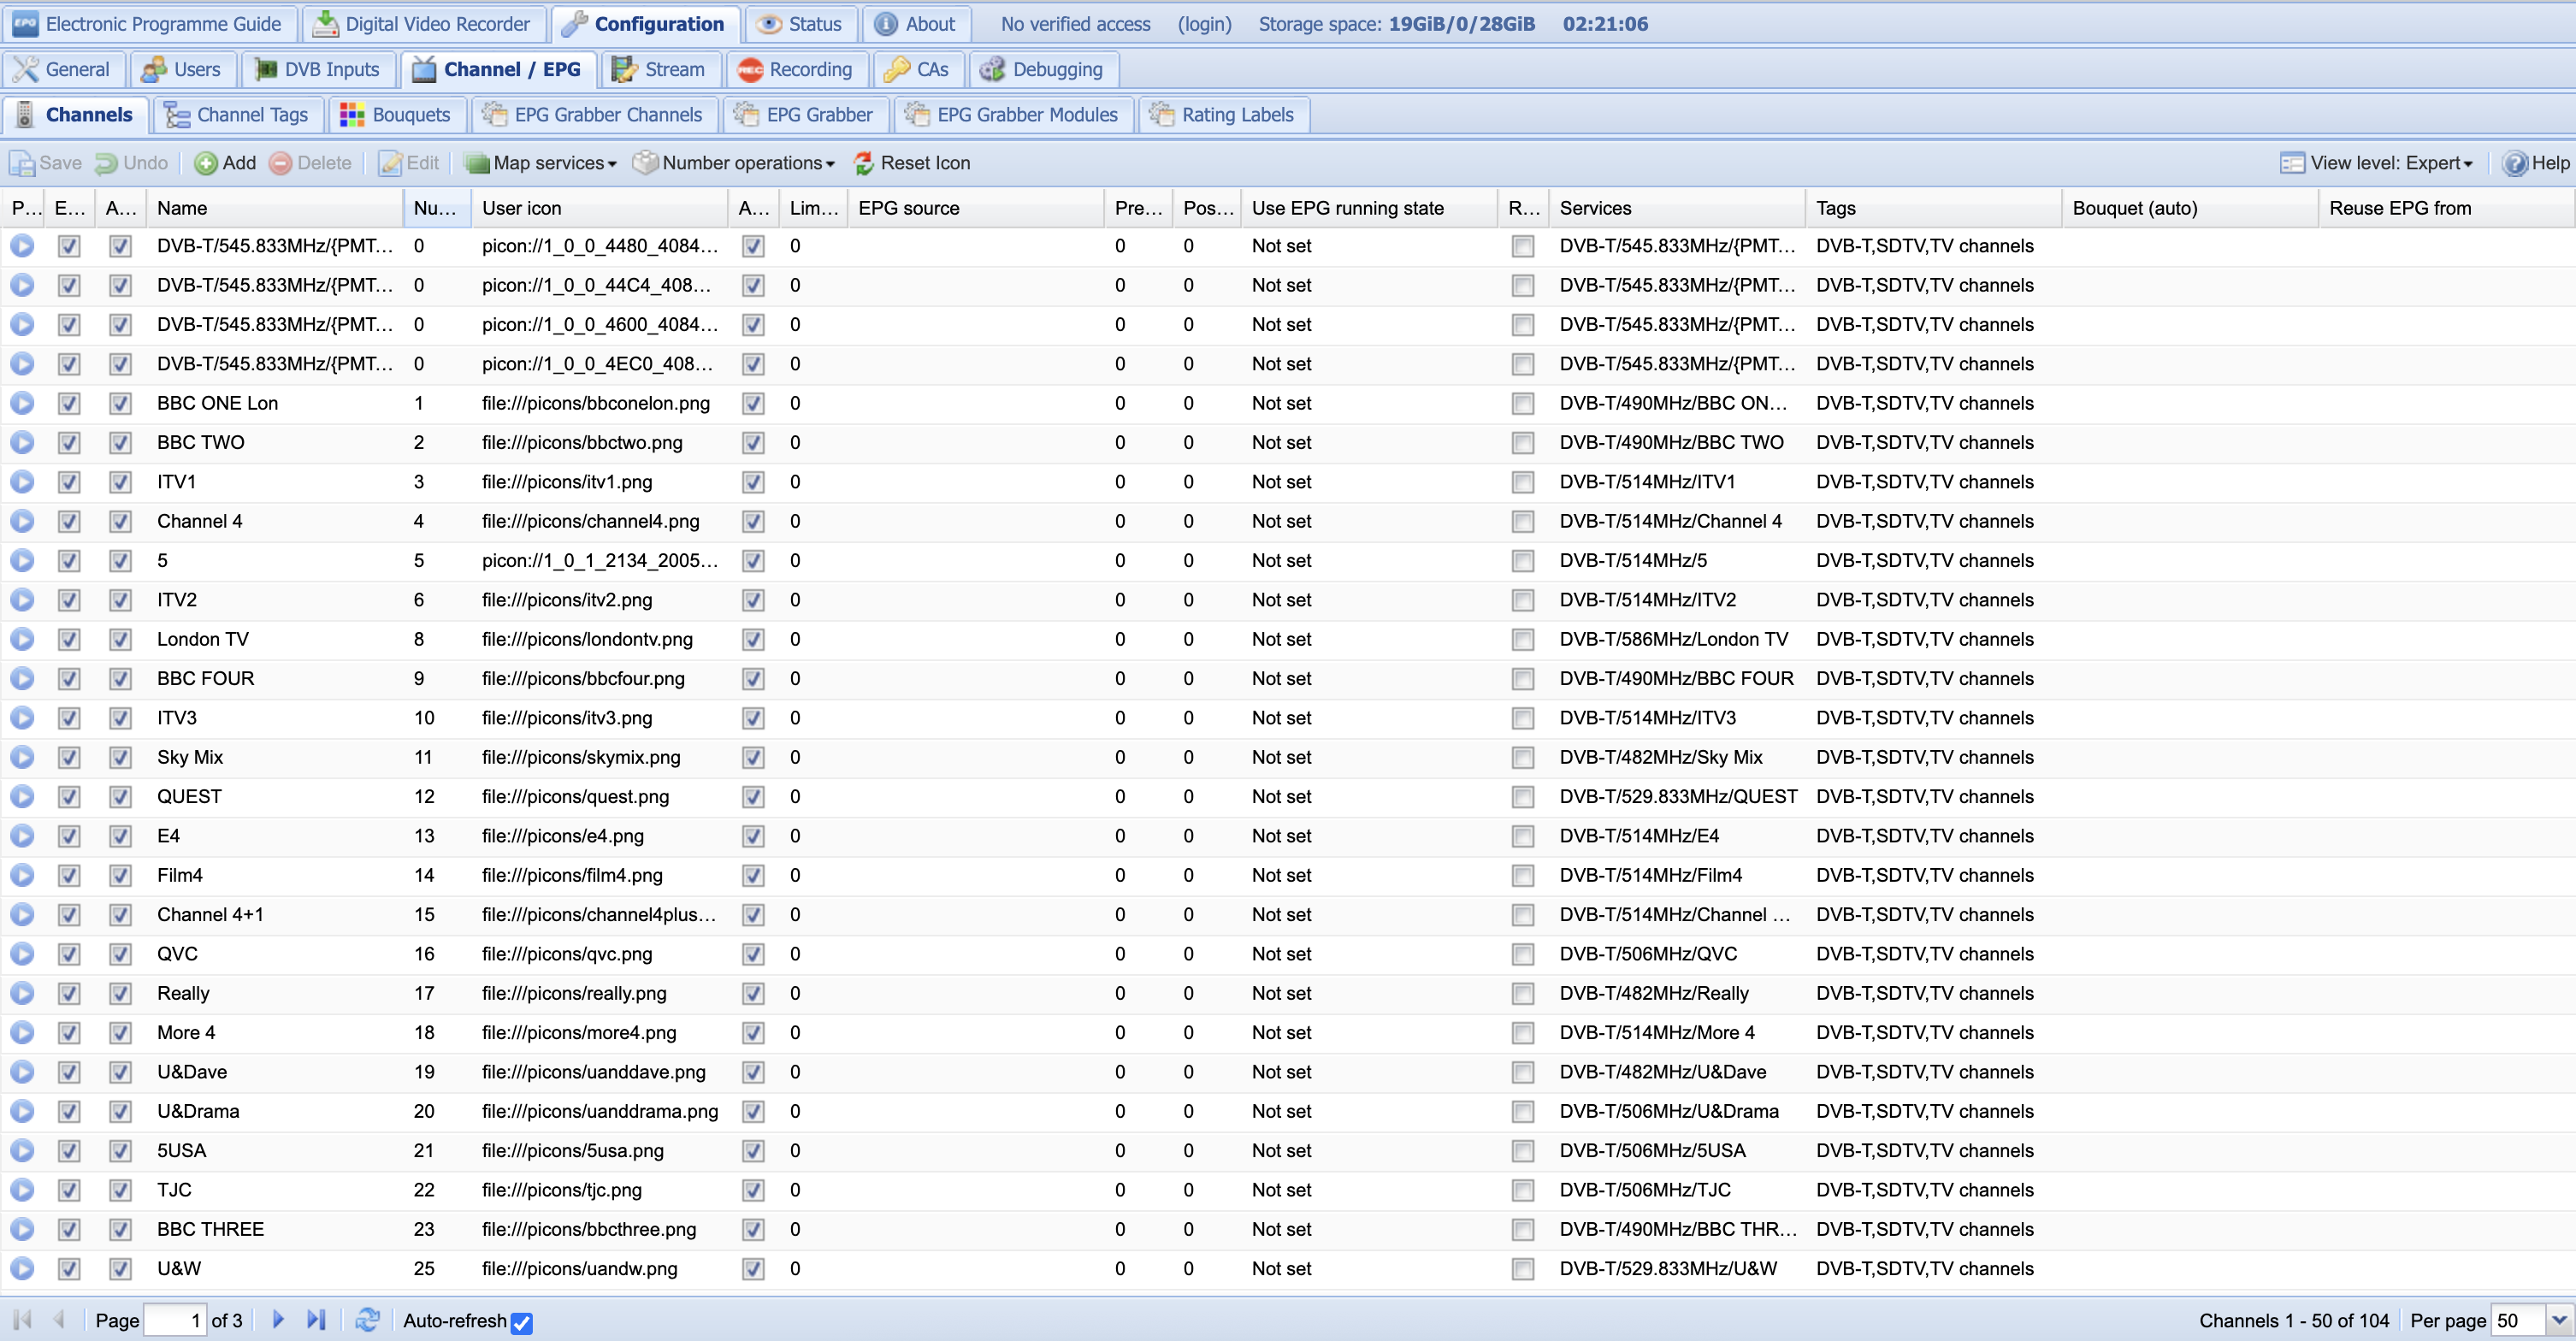
When the mapping is complete, return to the Channels tab; you should now see
all the TV and radio channels you expect.
Configure an EPG grabber
We’re going to need an electronic programme guide (EPG) to give us all the metadata about the programmes being broadcast on all our channels.
Go to Configuration -> Channel / EPG -> EPG Grabber Modules. There are many
modules that can grab EPG data from various sources. You can have multiple
grabbers enabled if you wish with different priorities. However, I just want the
Over-the-air: UK: Freeview grabber because that matches the content my tuner
is picking up.
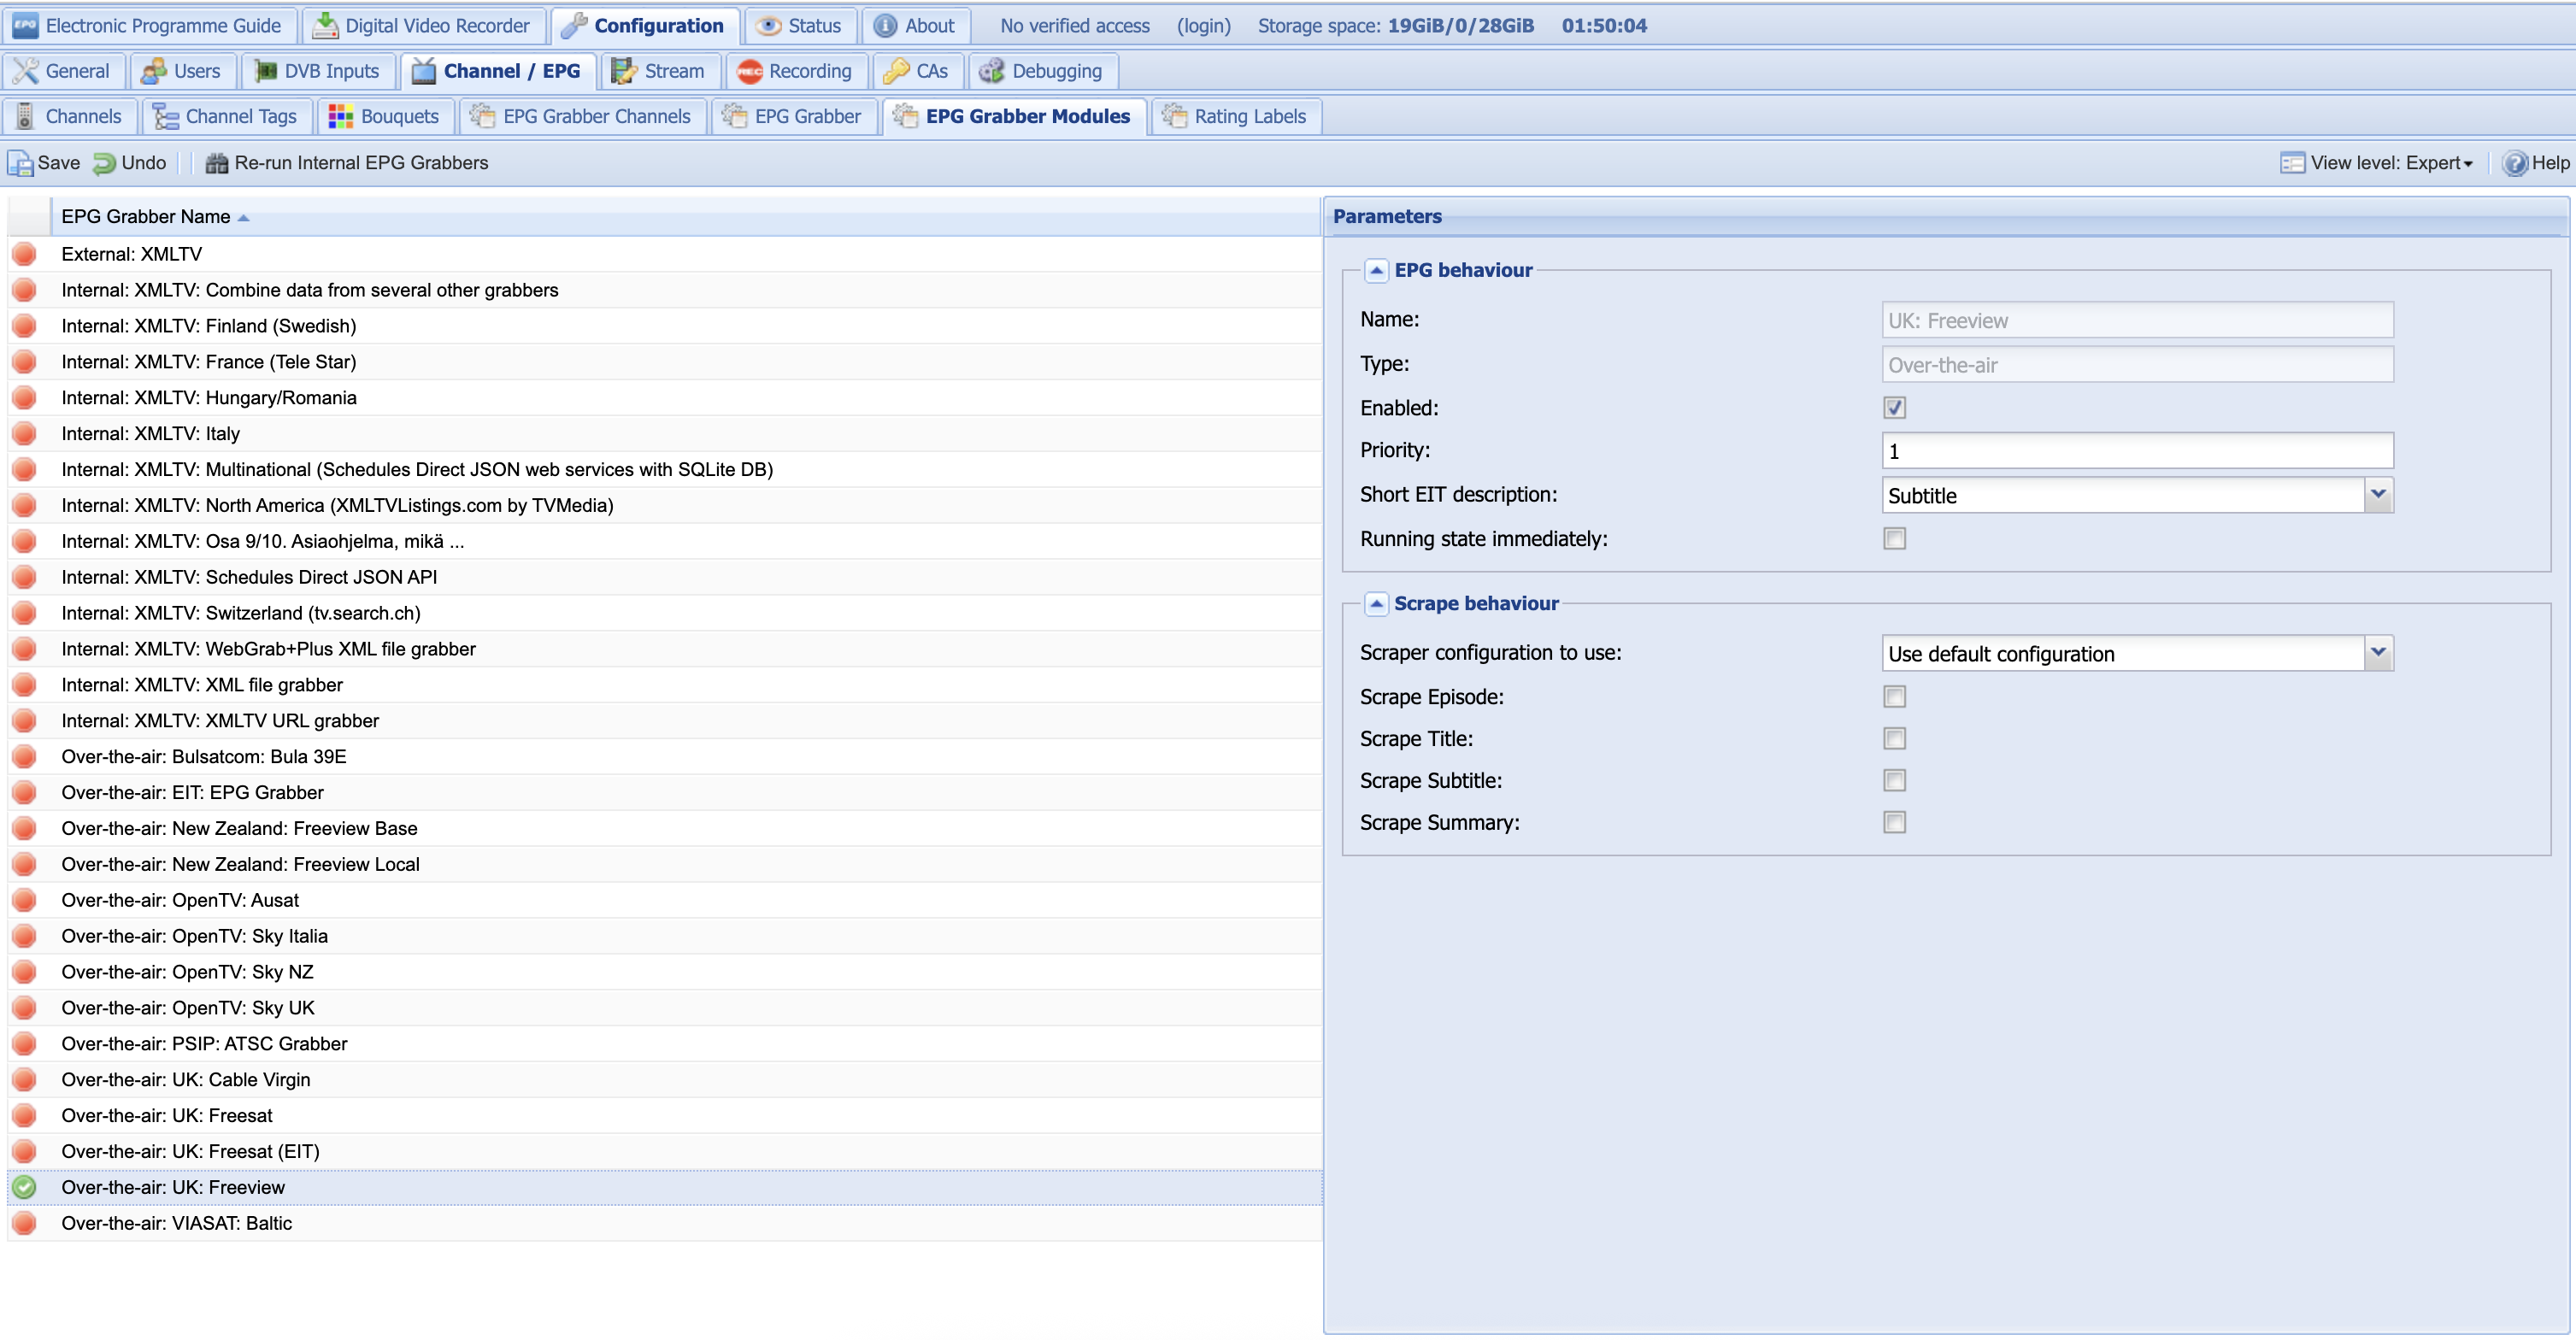
Once you’ve enabled the grabbers you want, click the Save button. Now go to
the Electronic Programme Guide tab; you should see a list of programmes and
their progress. If you click on one of then you should see metadata about the
programme including start and end times and a description.
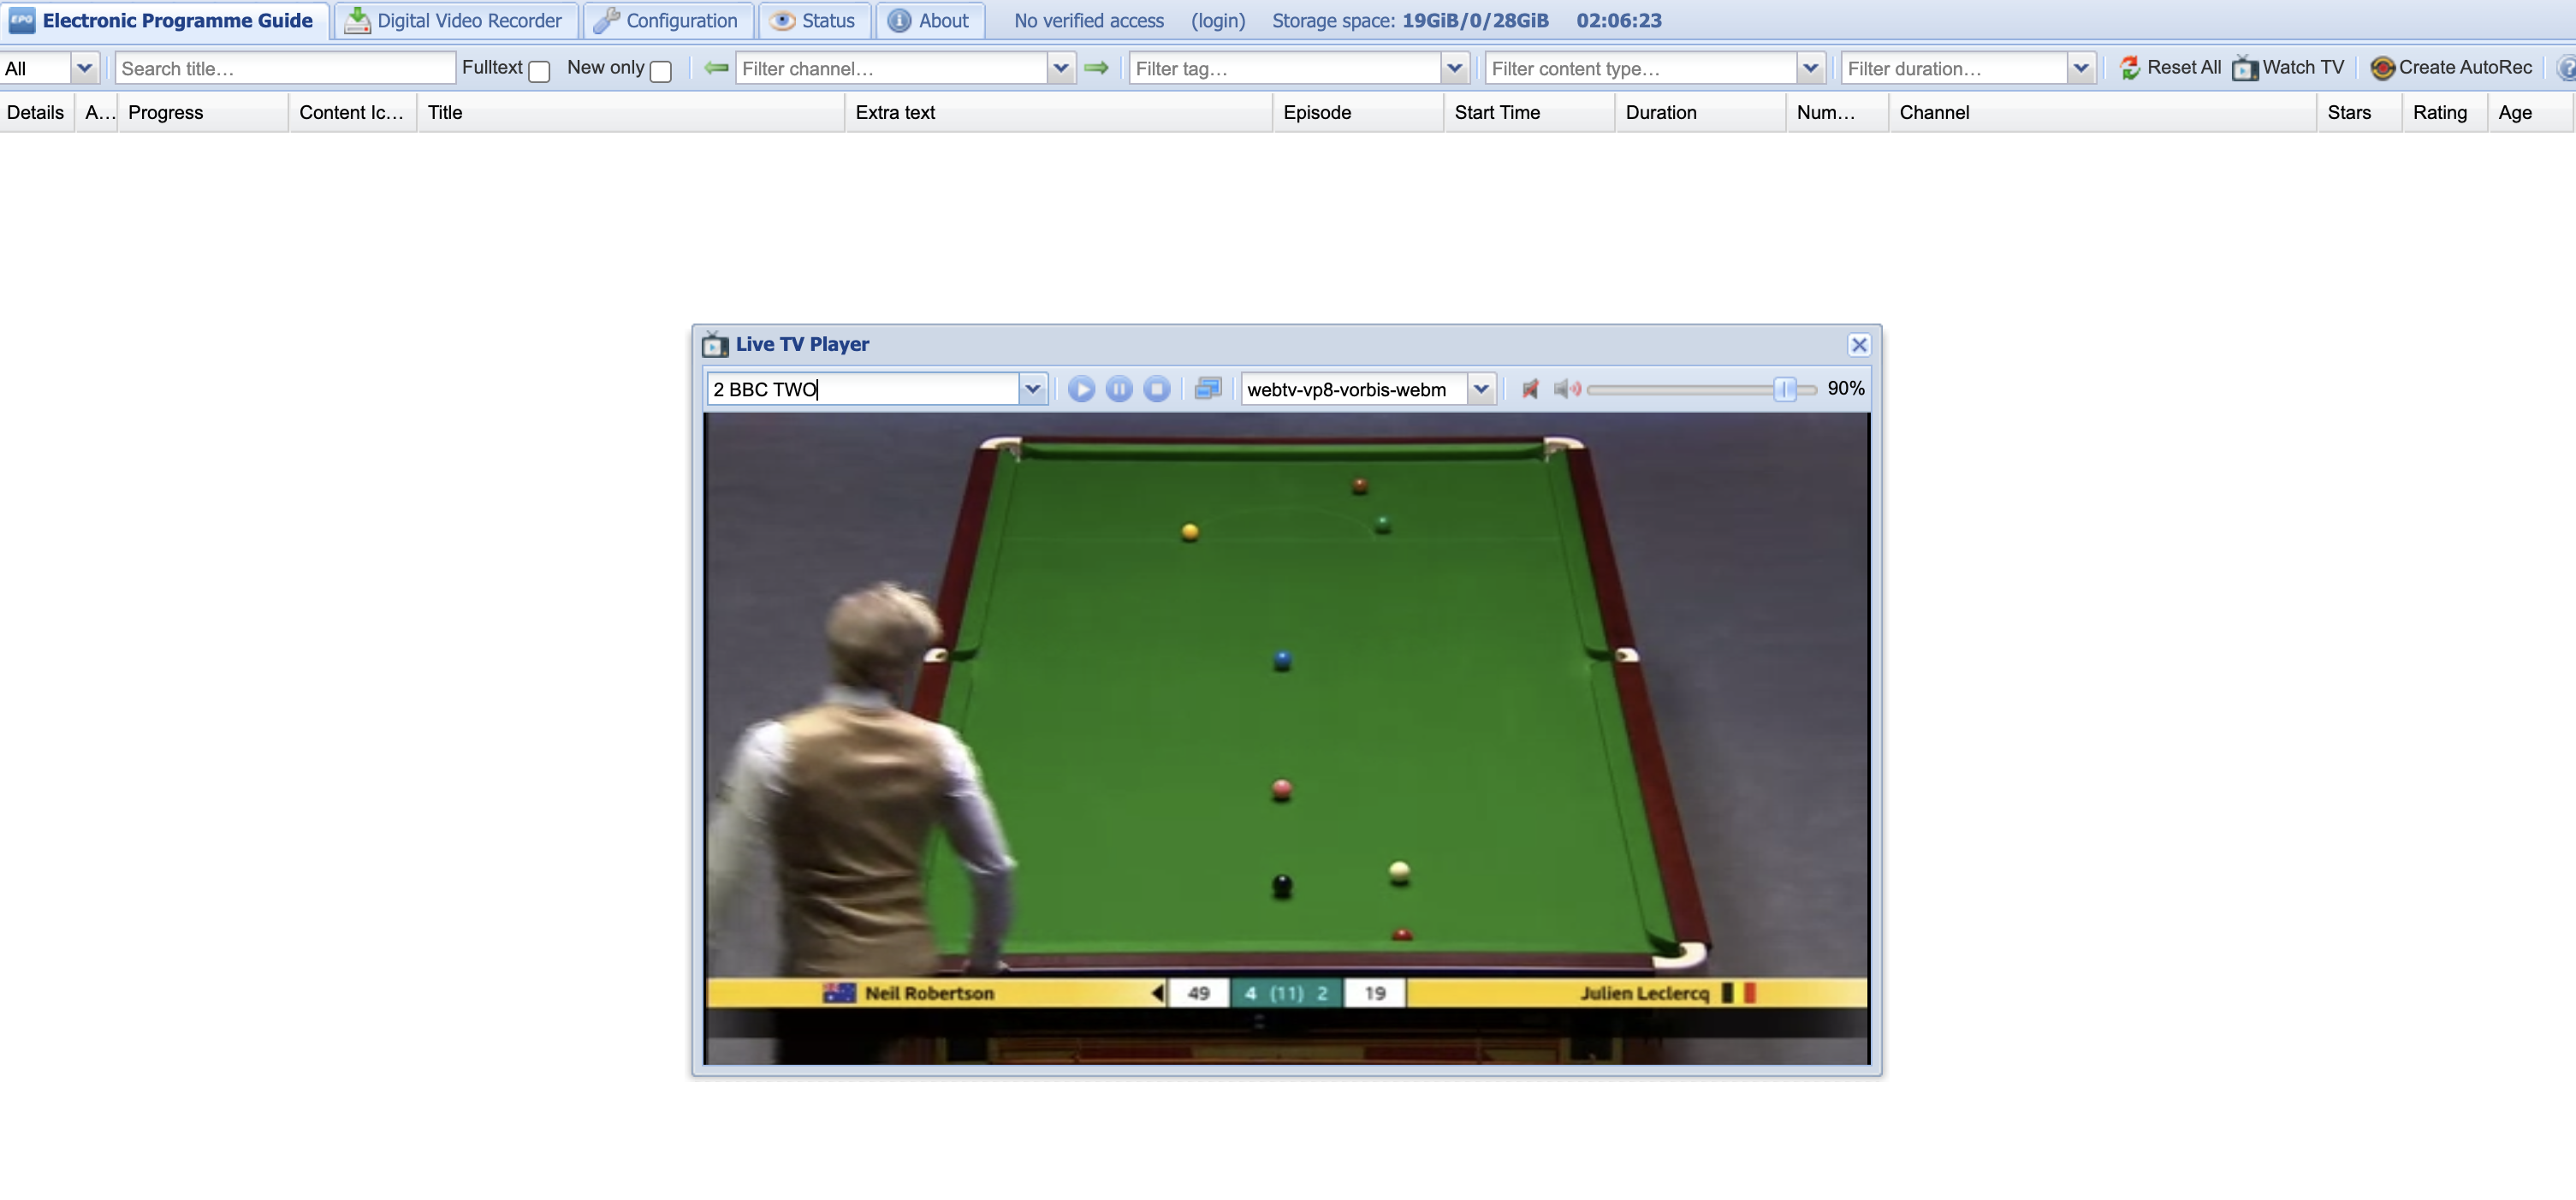
Test viewing a channel in Tvheadend
You can test viewing a TV channel in the Tvheadend web interface. From the
Electronic Programme Guide tab, click the Watch TV button on the right.
Select a channel from the Select channel drop-down list. You may also need to
select a specific streaming profile for this to work; I had to select
webtv-vp8-vorbis-webm as the others wouldn’t work.
All being well you should see live TV!
Test streaming live TV on an android device
There are a number of apps for android devices that can stream from Tvheadend. One is Kodi, which is an excellent open source media player. There is also dream Player for TVheadend.
Here’s what Kodi’s channel list looks like when connected to Tvheadend. The EPG data and channel icons have come from Tvheadend. Pretty isn’t it!
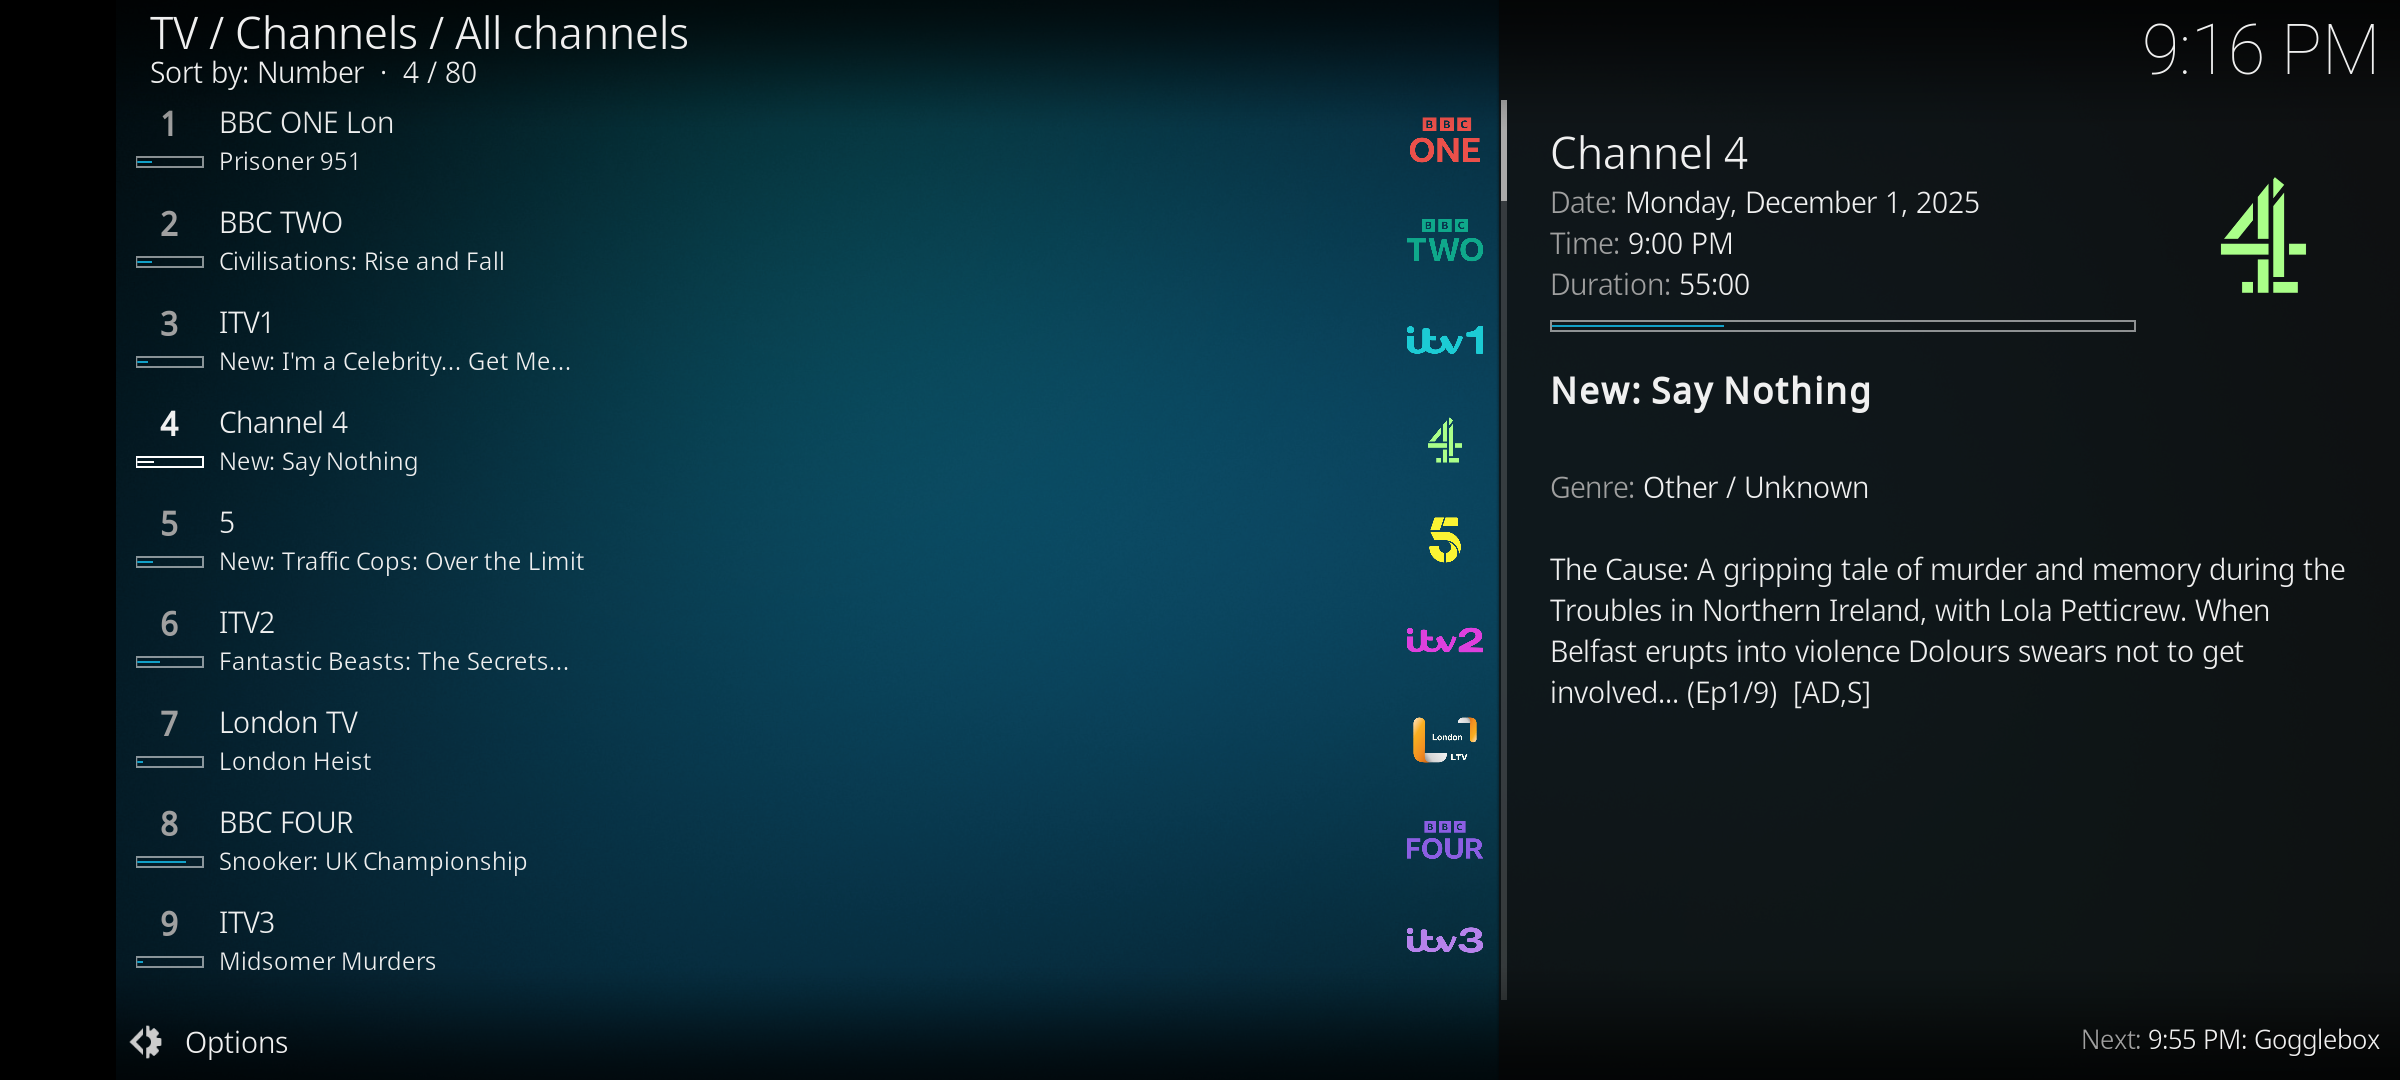
And this is what live TV looks like in Kodi:

Streaming to multiple clients
It is possible to stream different channels from Tvheadend to different clients simultaneously. However, for each tuner it is only possible to stream channels from the same mux, because a tuner can only be tuned to a single frequency. If you want to stream channels from different muxes to multiple clients simultaneously you will need additional tuners. Thankfully, the XBox digital TV tuners I’m using are really cheap to pick up second hand and it’s easy to connect two or three of them to a Raspberry Pi.